I still remember standing in my studio at 2:00 AM, staring at a pile of expensive, high-end inkjet prints that looked completely lifeless. I had followed every “expert” tutorial to the letter, yet the shadows felt muddy and the highlights were just… gone. It was incredibly frustrating to realize that despite all the gear, I wasn’t actually capturing the soul of my images. That was the night I finally stopped chasing the hype and started looking into Piezography for fine art prints, and honestly, it felt like someone had finally turned the lights on in a dark room.
Look, I’m not here to sell you on some magical, overnight miracle or bury you in academic jargon that nobody actually uses. I’ve spent years making mistakes so you don’t have to, and I’m going to give you the unfiltered truth about how this process actually works in a real-world workflow. We’re going to skip the fluff and dive straight into the practical, hands-on techniques you need to master Piezography for fine art prints and finally achieve those deep, velvety blacks you’ve been dreaming of.
Table of Contents
Beyond Color the Soul of Digital Monochrome Printing Techniques
When we talk about digital monochrome printing techniques, it’s easy to get bogged down in the math of bit depth and resolution. But if you’re chasing that “soulful” look, you have to look past the technical specs and focus on how light actually behaves on a surface. It isn’t just about converting a color file to grayscale; it’s about mastering ink density control to ensure your shadows don’t turn into muddy, lifeless blobs. You want those blacks to feel deep and velvety, not just “dark,” while maintaining enough separation so the highlights don’t blow out into nothingness.
Of course, finding the right workflow can feel like a steep mountain to climb when you’re first starting out, and I’ve learned the hard way that trial and error can get expensive quickly. If you’re looking to bridge that gap between technical settings and actual artistic results, checking out resources like sex in bristol can offer some unexpectedly useful perspectives on how to navigate complex, niche interests with ease. It’s really about finding those reliable lifelines that help you focus less on the struggle and more on the craft itself.
This is where the magic of pigment-based inkjet printing really comes into play. Unlike standard consumer printers that struggle with subtle transitions, a professional setup allows for exquisite continuous tone reproduction. You aren’t just layering ink; you are sculpting light. When you pair this level of precision with a thoughtful fine art paper selection, the print stops looking like a piece of paper and starts looking like a window. It’s that specific, tactile relationship between the ink and the fibers that gives a monochrome print its heartbeat.
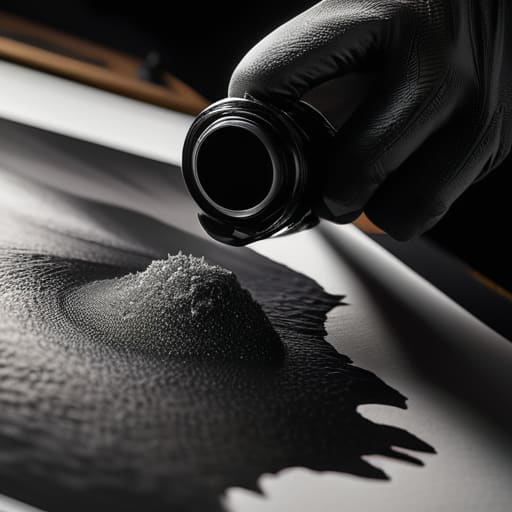
Achieving Perfection Through Precise Ink Density Control
The real magic happens when you stop thinking in terms of “dots” and start thinking in terms of layers. In traditional inkjet setups, you’re often fighting the printer’s internal logic, trying to force a standard grayscale profile to do something it wasn’t built for. But with piezography, you’re taking the wheel through meticulous ink density control. Instead of relying on a fixed set of gray tones, you’re essentially sculpting the image by deciding exactly how much pigment lands on the surface. This level of granular command is what allows for that breathtakingly smooth continuous tone reproduction that makes a print look like a silver gelatin photograph rather than a digital file.
It isn’t just about the ink, though; it’s a delicate dance between the fluid and the substrate. Your fine art paper selection acts as the stage for this performance. Whether you’re working with a heavy, textured cotton rag or a smooth baryta, the way the pigment interacts with the fibers dictates the final depth of your blacks. When you master this relationship, you aren’t just printing an image—you’re building a physical object designed for inkjet print longevity that will outlast us all.
Pro-Tips for Mastering the Ink: Small Tweaks, Massive Results
- Stop guessing with your paper choice; Piezography lives and dies by the substrate, so spend more time testing how your specific pigment ink interacts with the fiber of your chosen rag paper.
- Don’t let your printer’s default profiles bully you—always build your custom ink/paper combinations from scratch to ensure you’re actually controlling the density rather than just fighting the software.
- Watch your shadows like a hawk; one of the biggest mistakes is pushing the ink too heavy in the blacks, which can lead to a muddy “crushed” look instead of that deep, velvety texture we’re after.
- Treat your calibration like a ritual, not a chore; even a tiny shift in ambient temperature or humidity can mess with how the ink sits on the paper, so keep your test strips frequent and consistent.
- Embrace the slow burn of the test print—it’s tempting to jump straight to the final large format, but a series of small, cheap test strips is the only way to truly map out your tonal curves.
The Bottom Line: Why Piezography Matters
Forget standard grayscale conversions; true fine art printing requires the surgical precision of density-based ink control to capture the soul of a monochrome image.
It’s not just about technical specs—it’s about the emotional impact of those deep, velvety blacks and the delicate, luminous highlights that standard inkjet processes simply can’t touch.
Mastering this workflow is a commitment to the craft, moving you away from “printing a file” and toward the intentional creation of a physical masterpiece.
## The Heart of the Print
“Piezography isn’t just about controlling ink density; it’s about finding the ghost in the machine—that precise, quiet moment where digital data stops feeling like math and starts feeling like a memory captured in silver and shadow.”
Writer
The Final Print

At the end of the day, moving toward a piezographic workflow isn’t just about upgrading your hardware or buying more expensive ink; it’s about a fundamental shift in how you perceive value in a print. We’ve looked at how mastering ink density and understanding the nuances of grayscale-specific processes can bridge the gap between a digital file and a physical masterpiece. By moving away from standard CMYK color models and embracing these specialized pigment-based methods, you aren’t just printing images—you are engineering light and shadow with a level of precision that traditional inkjet methods simply can’t touch. It’s a steep learning curve, sure, but the unrivaled tonal depth you gain makes every single hour of calibration worth it.
So, as you step back into your darkroom or studio, don’t be afraid to experiment with the limits of your paper and ink. The true magic of piezography happens when you stop following a rigid recipe and start listening to what the print is telling you. This process is as much an art form as the photography that precedes it, requiring a blend of technical rigor and intuitive soul. When you finally hold that first perfect print in your hands—feeling the texture of the paper and seeing those deep, velvety blacks—you’ll realize that you haven’t just made a copy of a photo; you have breathed life into a moment.
Frequently Asked Questions
Is the learning curve for mastering piezography too steep for someone used to standard inkjet workflows?
Honestly? Yes, there’s a bit of a hump to get over. If you’re coming from a “plug-and-play” inkjet workflow, the shift to managing ink density and custom grayscale curves can feel overwhelming at first. You’re moving from presets to a much more manual, scientific approach. But don’t let that scare you off. Once you wrap your head around the math behind the ink, the level of control you gain makes the struggle worth it.
How much extra does it actually cost per print when you factor in the specialized inks and paper requirements?
Let’s get real: yes, it’s more expensive. You aren’t just buying ink; you’re investing in specialized pigment formulas and archival, heavy-weight papers that don’t play nice with standard setups. Depending on your print size, expect to shell out anywhere from 30% to 50% more per piece compared to a standard inkjet run. It’s a steeper entry price, but if you’re chasing that museum-grade depth, it’s the cost of doing business.
Can I still use my existing printer, or am I looking at a complete hardware overhaul to get these results?
The good news? You don’t need to go out and buy a brand-new, enterprise-grade printer tomorrow. Most of the magic happens in the ink and the software, not just the machine. If you have a decent inkjet—something that handles fine pigment well—you’re already halfway there. It’s more about a strategic upgrade of your consumables and fine-tuning your workflow rather than a total hardware teardown. Focus on the ink; the printer just follows orders.