I still remember the first time I attempted to get a perfect sear on a steak. As a former bush pilot, I was no stranger to high-pressure situations, but the kitchen was a different kind of cockpit. I had heard that achieving the perfect sear was all about using the highest heat possible, but I soon discovered that this approach often led to a charred exterior and a raw interior. It wasn’t until I applied the same principles of careful planning and attention to detail that I used in flight to my cooking that I was able to master the art of how to get a perfect sear on a steak.
As someone who’s passionate about breaking down complex topics into simple, understandable steps, I’m excited to share my approach to cooking the perfect steak. In this article, I’ll walk you through the straightforward process of how to get a perfect sear on a steak, from preparing the meat to plating the final dish. You’ll learn how to create a mouth-watering crust without overcomplicating things, and by the end of it, you’ll be confident in your ability to cook a delicious steak every time. Whether you’re a seasoned chef or a culinary beginner, my goal is to provide you with practical advice that you can apply in your own kitchen, so you can enjoy a perfectly seared steak without the guesswork.
Table of Contents
Guide Overview: What You'll Need
Total Time: 30 minutes to 1 hour
Estimated Cost: $15 – $30
Difficulty Level: Intermediate
Tools Required
- Cast Iron Skillet (or other oven-safe skillet)
- Tongs (for flipping the steak)
- Oven Mitts (for handling hot skillet)
- Meat Thermometer (for checking internal temperature)
Supplies & Materials
- High-Quality Steak (preferably 1 to 1.5 inches thick)
- Oil with High Smoke Point (such as avocado oil or grapeseed oil)
- Salt (preferably flaky sea salt or kosher salt)
- Pepper (freshly ground black pepper)
- Optional Seasonings (such as garlic powder or paprika)
Step-by-Step Instructions
- 1. First, let’s start by selecting the right cut of meat for our perfectly seared steak. I like to think of this step as choosing the right aircraft for a flight – you need to consider the mission and the conditions. For a great sear, you’ll want a cut that’s at least 1-1.5 inches thick, such as a ribeye or a strip loin. This thickness will allow for a nice crust to form on the outside while keeping the inside juicy.
- 2. Next, we need to bring the steak to room temperature. This is similar to conducting pre-flight checks – we’re ensuring everything is ready for takeoff. Remove the steak from the refrigerator and let it sit at room temperature for about 30-45 minutes. This step is crucial because it helps the steak cook more evenly, much like how a pre-flight check ensures a smooth flight.
- 3. Now, season the steak liberally with your choice of seasonings. I like to keep it simple with salt, pepper, and a bit of garlic powder. Think of this as setting your navigation system – you’re giving your steak the right coordinates for flavor. Make sure to season both sides of the steak, just as you would check both your primary and secondary navigation systems before flight.
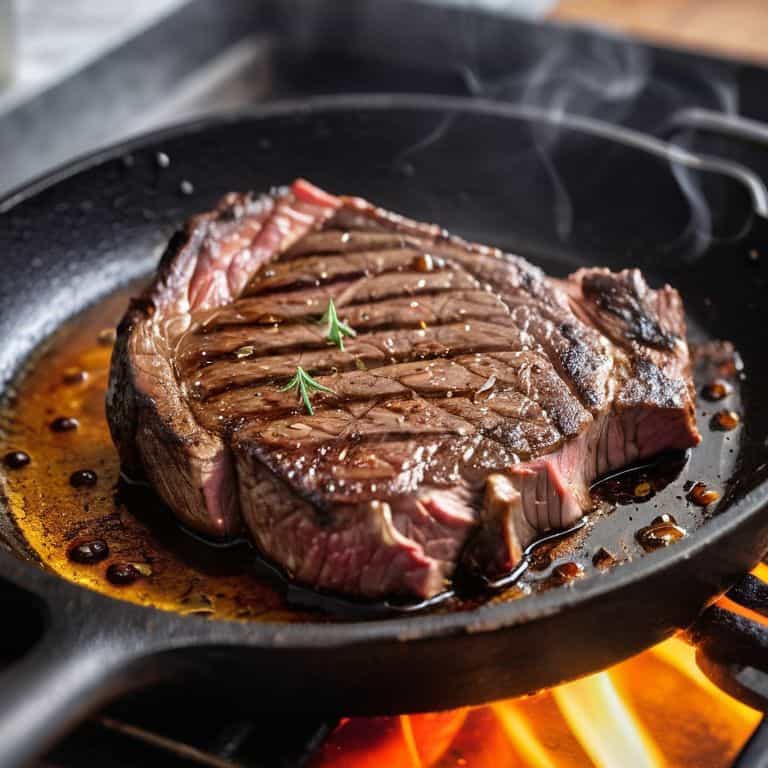
- 4. Preheat your skillet or grill pan over high heat, just as you would rev up your engines for takeoff. You want the pan to be smoking hot, which will help create that perfect crust on the steak. While the pan is heating up, add a small amount of oil to the pan – I prefer using avocado oil for its high smoke point. This is like fueling up for your flight – you need the right fuel to reach your destination.
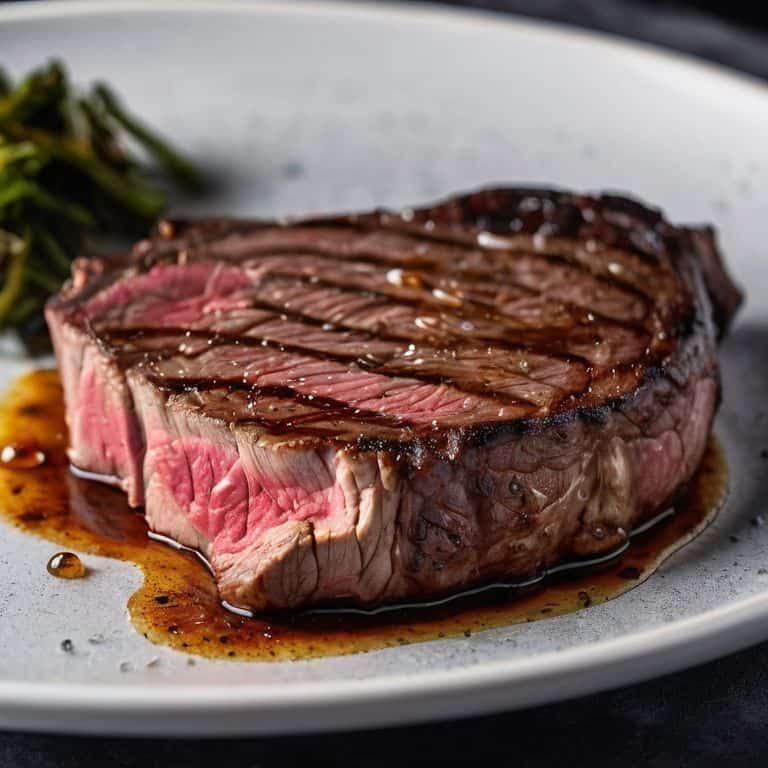
- 5. With your pan hot and your steak seasoned, it’s time to sear the steak. Place the steak in the pan and let it cook for 3-4 minutes on the first side, depending on the thickness of the steak. You’re looking for a nice brown crust to form, which is like achieving the perfect climb rate – it sets you up for success. Once you’ve achieved that crust, flip the steak over and cook for an additional 3-4 minutes, or until it reaches your desired level of doneness.
- 6. After flipping the steak, reduce the heat to medium-low and let it finish cooking. This is like leveling off at cruise altitude – you’ve done the hard work, and now it’s time to enjoy the ride. Use a meat thermometer to check the internal temperature of the steak, aiming for 130-135°F for medium-rare, 140-145°F for medium, and 150-155°F for medium-well.
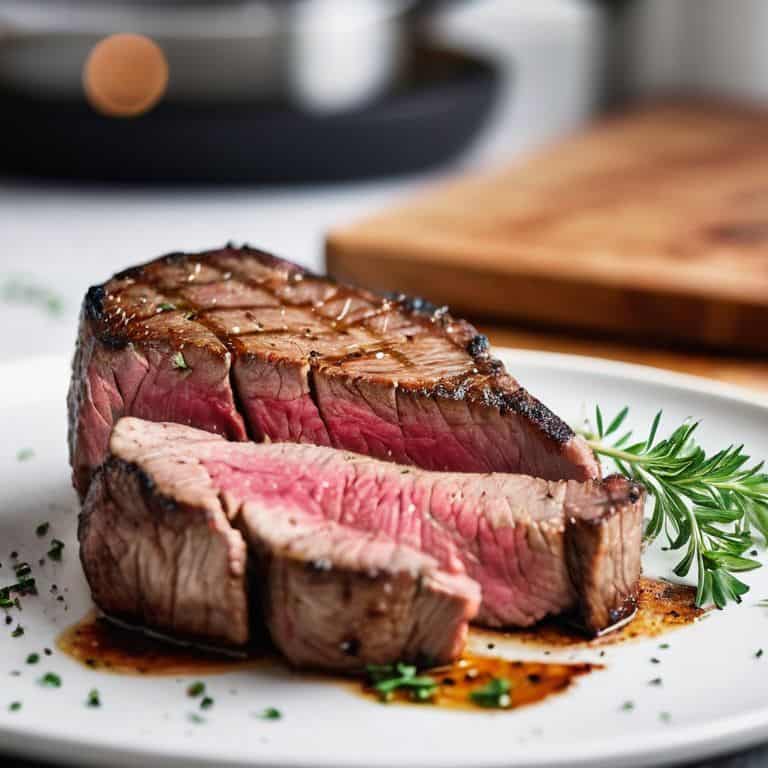
- 7. Once the steak is cooked to your liking, remove it from the heat and let it rest for 5-10 minutes. This is like entering the holding pattern – you’re giving the steak time to redistribute its juices, ensuring it stays tender and flavorful. During this time, you can prepare any additional elements of your meal, such as roasted vegetables or a salad, much like how you would prepare for landing by configuring your aircraft and checking your surroundings.
Mastering Steak Searing

As we dive deeper into the world of steak searing, it’s essential to understand the importance of meat temperature. A perfectly cooked steak is not just about the sear, but also about achieving the right internal temperature. This is where a thermometer comes in handy, allowing you to precisely control the doneness of your steak. Whether you prefer your steak rare, medium, or well-done, a thermometer will help you avoid overcooking and ensure a juicy, tender result.
When it comes to steak seasoning for optimal flavor, the key is to keep it simple. A light sprinkle of salt, pepper, and any other desired herbs or spices will do the trick. Avoid over-seasoning, as this can overpower the natural flavor of the steak. Instead, focus on enhancing the natural flavors of the meat. Remember, the goal is to create a harmonious balance of flavors that will elevate your steak to the next level.
In the battle of skillet vs grill for steak, both options have their advantages. A skillet provides a more controlled environment, allowing for a precise sear, while a grill adds a smoky flavor that’s hard to replicate. Ultimately, the choice between the two comes down to personal preference. By mastering steak searing techniques, you’ll be able to achieve a perfect sear regardless of whether you’re using a skillet or grill.
Nailing Steak Seasoning for Bursting Flavor
When it comes to nailing steak seasoning, I like to think of it as plotting a flight plan – you need to know your destination and the best route to get there. For a perfectly seasoned steak, that means understanding the balance between salt, pepper, and any other seasonings you prefer. Just as a well-tuned aircraft requires the right calibration, your steak needs the right balance of flavors to take off.
I recommend starting with the basics: a light dusting of salt and a few grinds of pepper. From there, you can add other seasonings as you see fit, but remember, the key is balance. Too much of any one thing can throw off the entire dish, much like how too much turbulence can make for a bumpy flight. By finding that perfect balance, you’ll be serving up steaks that are truly soaring to new heights.
Tuning Skillet Temperatures for Optimal Sear
To achieve that perfect sear, we need to fine-tune our skillet temperatures. Just like adjusting the throttle for optimal engine performance, we must find the sweet spot for our steak. I recommend preheating your skillet to a medium-high heat, around 4-5 on a scale of 1-10. This will allow for a nice crust to form on the steak without burning it. Think of it as navigating through turbulent air – we need to make adjustments to stay on course.
By using a thermometer to monitor the temperature, you’ll be able to make precise adjustments, much like a pilot uses instruments to navigate through instrument meteorological conditions. Aim for a temperature range of 400°F to 450°F (200°C to 230°C) for an optimal sear. With practice, you’ll develop a sense of when the skillet is ready, just like a pilot develops a sense of the aircraft’s performance.
Pre-Flight Checklist for a Perfectly Seared Steak
- Ensure your steak is at room temperature before searing, just like how a plane needs to be properly configured before takeoff
- Select the right skillet for the job, considering factors like heat distribution and retention, much like choosing the optimal aircraft for a specific flight mission
- Pat dry the steak with a paper towel to remove excess moisture, similar to how a pilot must ensure a clean and dry aircraft surface for optimal performance
- Use a combination of oil with a high smoke point and a small amount of butter for added flavor, analogous to how a pilot mixes fuel types for optimal engine performance
- Don’t move the steak too much during the searing process, allowing it to develop a nice crust, just like how a pilot must maintain a steady hand during critical phases of flight
Key Takeaways for a Perfectly Seared Steak
Preheating your skillet to the right temperature is crucial, just like setting the correct altitude before landing – it ensures a smooth and successful outcome
Seasoning your steak with the right balance of ingredients is akin to navigating through turbulence, it requires precision and the right timing to achieve the desired flavor
Allowing your steak to rest after searing is similar to following a standard post-flight checklist, it ensures that all the flavors are retained and the steak is cooked to perfection, making it a safe and enjoyable dining experience
Flying High in the Kitchen
Just as a smooth takeoff requires precise control, a perfect sear on a steak demands a delicate balance of heat, timing, and technique – master these elements and you’ll be soaring to new culinary heights.
Daniel Sato
Landing Safely with a Perfectly Seared Steak
As we touch down on our journey to achieving the perfect sear on a steak, let’s do a quick preflight review of the key points we’ve covered. We started with the importance of selecting the right cut of meat, then moved on to the crucial steps of tuning our skillet temperatures for an optimal sear, and finally, we discussed the art of nailing steak seasoning for that bursting flavor. By following these step-by-step instructions, you’ve essentially created a personalized flight plan for your steak, ensuring it lands safely on your plate, cooked to perfection.
Now, as you embark on your own culinary flights, remember that the pursuit of a perfectly seared steak is not just about the destination, but about the journey itself. It’s about understanding the fundamentals of cooking, just as a pilot understands the fundamentals of flight. So, go ahead, take to the skies of culinary exploration, and always keep in mind that with practice and patience, you can soar to new heights in the kitchen, one deliciously seared steak at a time.
Frequently Asked Questions
What type of steak is best suited for achieving a perfect sear?
For a perfect sear, I recommend a nice ribeye or strip loin – their marbling and thickness allow for a beautiful crust to form. Think of it like flying through different air densities, you want the right conditions for a smooth ride, or in this case, a perfect sear.
How do I prevent the steak from burning or overcooking while trying to get a perfect sear?
To prevent burning or overcooking, think of it like navigating through turbulence – you need to be gentle and attentive. Use a thermometer to monitor the skillet’s temperature, and don’t be afraid to adjust the heat. Also, don’t overcrowd the skillet, cook steaks one at a time, and use a timer to ensure you’re not overcooking.
Can I achieve a perfect sear on a steak using a non-stick skillet or does it require a cast-iron or stainless steel pan?
While non-stick skillets can work, they often can’t achieve the same high heat as cast-iron or stainless steel, which are ideal for a perfect sear. Think of it like taking off in a small plane – you need a strong runway to gain speed. Cast-iron and stainless steel provide that intense heat runway for a mouth-watering crust.