I still remember the day I decided to ditch my old gaming console and build my own Retro-Gaming Arcade from scratch. It was a crazy idea, but I was determined to bring back the nostalgia of classic games and share it with my friends. The common myth is that a Retro-Gaming Arcade Build requires a ton of technical expertise and a huge budget, but I’m here to tell you that’s just not true. With some creativity and elbow grease, you can create your own arcade that’s just as fun as the ones you used to visit as a kid.
So, what can you expect from this article? I’ll be sharing my personal experience and no-nonsense advice on how to build a Retro-Gaming Arcade that’s tailored to your tastes. From sourcing the right materials to troubleshooting common issues, I’ll guide you through the entire process. My goal is to empower you to take matters into your own hands and create something truly unique. By the end of this article, you’ll have a clear understanding of how to bring your own Retro-Gaming Arcade Build to life, and I’m excited to be a part of your journey.
Table of Contents
Project Overview

Total Time: 10 hours 30 minutes
Estimated Cost: $500 – $1000
Difficulty Level: Intermediate / Hard
Tools Required
- Circular Saw ((for cutting wood))
- Drill Press ((for precise drilling))
- Jigsaw ((for curved cuts))
- Soldering Iron ((for electronic components))
- Wire Strippers ((for stripping wire insulation))
- Pliers ((for gripping small objects))
- Screwdrivers ((flathead and Phillips))
Supplies & Materials
- 2-in x 4-in lumber ((for frame construction))
- 3/4-in plywood ((for shelf and cabinet construction))
- Arcade Buttons ((for player controls))
- Joysticks ((for player controls))
- Raspberry Pi ((for running retro games))
- Power Supply ((for powering electronics))
- Wire ((for connecting components))
- Wood Glue ((for bonding wood pieces))
- Sandpaper ((for smoothing wood surfaces))
- Paint ((for finishing and decorating))
Step-by-Step Instructions
- 1. First, let’s gather our materials and get a sense of the space we’re working with. I like to think of this step as the foundation of our retro-gaming arcade build. We’ll need to collect old consoles, classic games, and a few other odds and ends to bring our vision to life. Take some time to scour local thrift stores, garage sales, and online marketplaces for the perfect pieces to include in your arcade.
- 2. Next, we’ll need to plan our layout. This is where things can get really creative, and I love seeing how different people choose to organize their space. Consider the flow of traffic, the placement of seating, and how you want to showcase your favorite games. Don’t be afraid to sketch out a few different designs and see what works best for you and your space.
- 3. Now it’s time to start building. We’ll begin by constructing the base of our arcade, which can be as simple as a wooden cabinet or as complex as a custom-built console table. I’m a big fan of using reclaimed wood and other unique materials to give our arcade a one-of-a-kind look. Take your time, and don’t be afraid to get a little messy – it’s all part of the process.
- 4. With our base in place, we can start adding the fun stuff. This includes installing our old consoles, hooking up classic games, and adding any other bells and whistles we want to include. I like to think of this step as the icing on the cake – it’s where our arcade really starts to come to life. Be sure to test everything as you go to ensure that all of our equipment is working properly.
- 5. One of the most important aspects of our retro-gaming arcade is the ambiance. We want to create an immersive experience that transports our guests back to a bygone era. To achieve this, we can add elements like neon lighting, vintage posters, and even classic arcade sounds. Don’t be afraid to get creative and think outside the box – the more unique our arcade is, the more memorable it will be.
- 6. As we near completion, it’s time to add the finishing touches. This can include everything from staining and polishing our wooden components to adding decorative trim and molding. I’m a big fan of using natural materials and handcrafted details to give our arcade a truly unique look. Take your time, and don’t be afraid to experiment – it’s all part of the fun.
- 7. Finally, it’s time to plug in and play. We’ve worked hard to get to this point, and now it’s time to enjoy the fruits of our labor. Invite some friends over, fire up your favorite classic games, and get ready to experience the ultimate in retro-gaming fun. Remember, the most important thing is to have fun and be willing to try new things – after all, that’s what this project is all about.
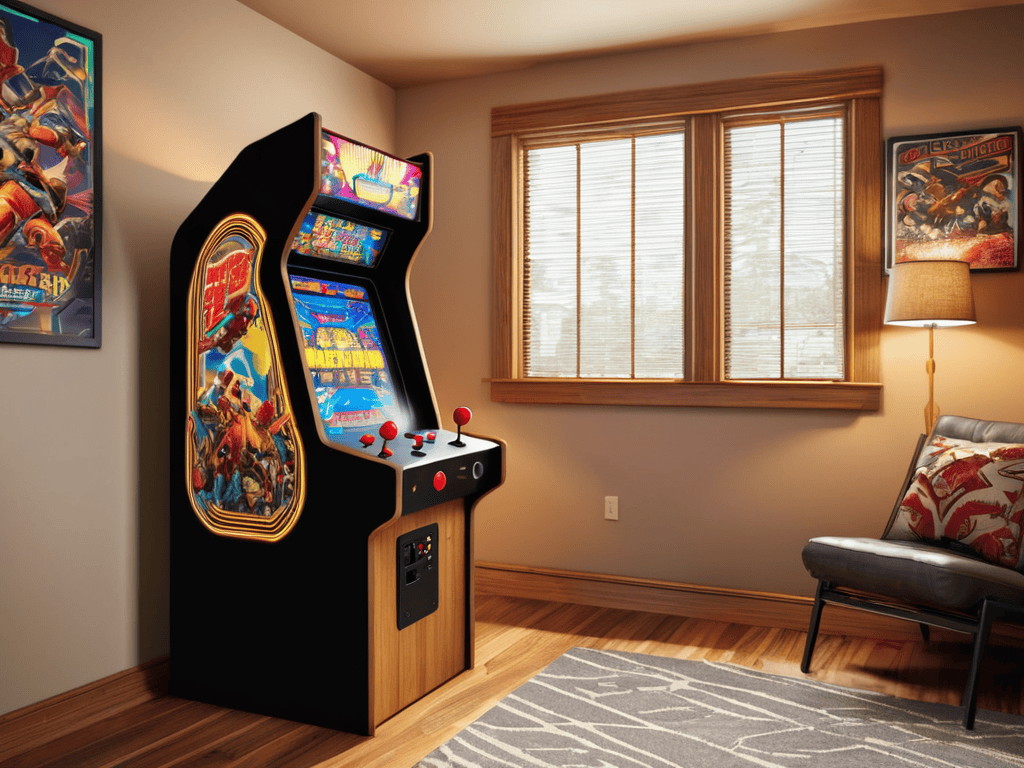
Retro Gaming Arcade Build
As I dove into my own custom arcade controller build, I realized the importance of attention to detail. The feel of the buttons and joystick can make all the difference in your gaming experience. I spent hours researching vintage arcade game emulation to get a sense of the authentic arcade feel. My goal was to create a seamless experience that would transport me back to the classic arcades of my childhood.
When it comes to building a mame arcade, it’s all about the little things. The design of the arcade machine, the choice of games, and even the lighting can all contribute to an immersive experience. I found my arcade machine design inspiration in old-school arcades, with their bright colors and retro flair. By incorporating these elements, I was able to create a unique and engaging gaming space.
As I was tweaking my arcade’s controller layout, I stumbled upon an amazing community of enthusiasts who share their projects and offer valuable insights on forums and blogs – it’s incredible how a simple customization can elevate your gaming experience. I’ve been following the work of some talented makers who showcase their creations on websites like t4m melbourne, and I must say, it’s been a great resource for finding inspiration and learning new techniques, especially when it comes to repurposing old hardware to create something entirely new and unique.
To take your arcade to the next level, consider exploring diy arcade stick projects. These can be a fun and creative way to customize your gaming experience. By comparing different retro gaming console comparison options, you can find the perfect fit for your arcade. With a little patience and creativity, you can create a one-of-a-kind gaming space that’s all your own.
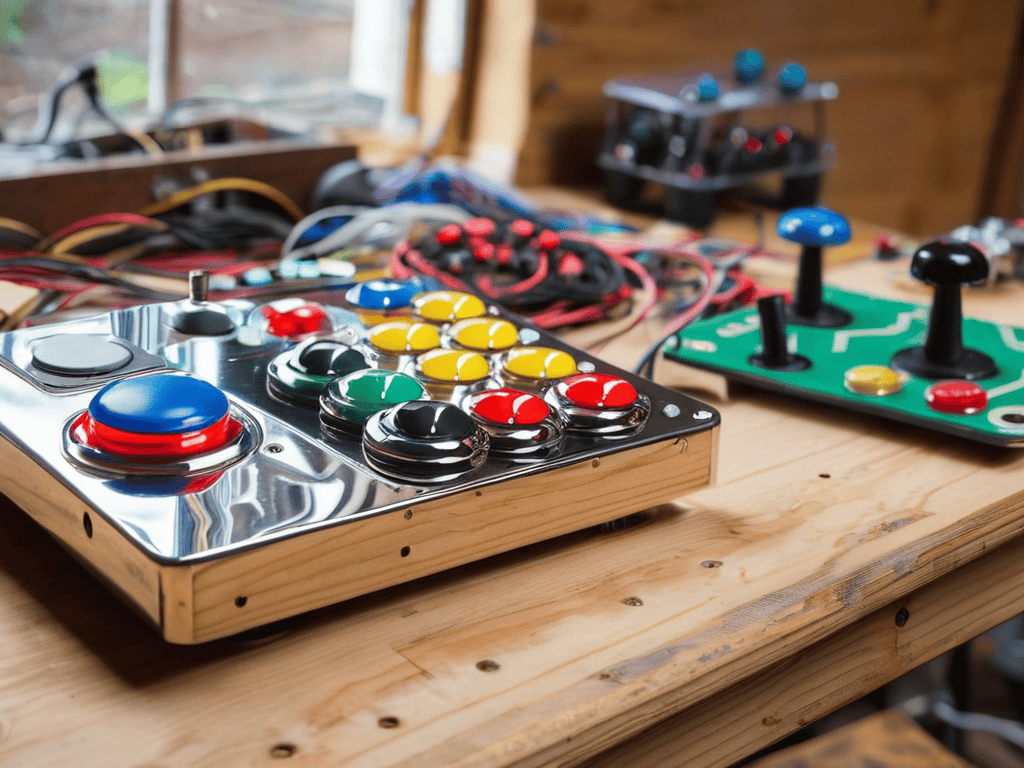
Custom Arcade Controller Build Secrets
Now that we’ve got our arcade up and running, let’s talk about the fun part – customizing our controllers. I’m a huge believer in getting hands-on, and building your own arcade controller from scratch is an absolute game-changer. Not only can you tailor the design to your favorite games, but you can also add your own personal flair. I’ve experimented with everything from vintage joystick mounts to custom button layouts, and the possibilities are endless.
For my own build, I opted for a combination of classic Sanwa buttons and a bespoke wooden enclosure. The result is a controller that’s not only uniquely mine, but also perfectly suited to my favorite retro titles. With a little creativity and some basic DIY skills, you can create your own dream controller – and trust me, it’s a total blast.
Vintage Arcade Game Emulation Hacks
Now that we’ve got our controllers built, it’s time to bring our retro-gaming arcade to life with some vintage arcade game emulation hacks. I’m talking about digging up those classic games we loved as kids and getting them to run seamlessly on our new setup. From Pac-Man to Donkey Kong, the possibilities are endless. I’ve spent countless hours scouring the internet for the best emulators and ROMs, and I’m excited to share my findings with you.
With a little tweaking and configuration, you’ll be able to play all your favorite childhood games on your very own arcade machine. I’ll walk you through the process of setting up the emulators, configuring the controls, and troubleshooting any issues that may arise. Get ready to relive the nostalgia and share it with your friends and family!
Get Your Game On: 5 Essential Tips for a Legendary Retro-Gaming Arcade Build

- Start with the heart of your arcade: the console – I’m talking original hardware, not some fancy emulator
- Curate your game selection like a mixtape: a little bit of nostalgia, a little bit of challenge, and a whole lot of fun
- Don’t be afraid to get creative with your controller build – think custom buttons, handmade joysticks, and a whole lot of personality
- Lighting is everything: think neon, think retro, think ‘I’m in a time machine’ – it’s all about ambiance, baby
- Make it a community effort: invite your friends over, have a build party, and get ready to unleash your inner child (and outer gamer)
Key Takeaways for Your Retro-Gaming Arcade Build
By repurposing old consoles and building custom controllers, you can create a unique retro-gaming experience that combines nostalgia with modern convenience
Emulation hacks can help you unlock a vast library of vintage games, making your arcade build a treasure trove of classic gaming fun
With a little creativity and some hands-on DIY spirit, you can craft an epic retro-gaming arcade that’s not only a blast to play, but also a reflection of your own personality and style
Building the Ultimate Gaming Experience
The real magic happens not when you plug in the console, but when you craft the entire experience with your own hands – the smell of the wood, the glow of the screens, and the thrill of bringing vintage games back to life.
Tom Navarro
Conclusion
As we wrap up our retro-gaming arcade build, let’s take a moment to reflect on the key points we’ve covered. From the initial planning stages to the final touches, we’ve explored the ins and outs of creating a unique gaming space that’s all about nostalgia and fun. We’ve dived into the world of custom arcade controller builds and vintage arcade game emulation hacks, giving you the tools and confidence to take your project to the next level.
So, what’s next? Now that you have the knowledge and inspiration to create your own retro-gaming arcade, it’s time to get creative and make it happen. Remember, the most important aspect of this project is to have fun and make it your own. Don’t be afraid to experiment, try new things, and push the boundaries of what’s possible. With a little patience and dedication, you’ll be enjoying your very own retro-gaming arcade in no time, reliving the magic of classic games and creating new memories with friends and family.
Frequently Asked Questions
What are the best types of wood to use for building a retro-gaming arcade cabinet?
I’m a big fan of using reclaimed or repurposed wood for my arcade cabinets, like old pallet wood or barn wood. But if you’re looking for something a bit more traditional, I’d say go for sturdy woods like maple, oak, or cherry – they’re perfect for withstanding all the button-mashing and joystick-jostling that comes with retro gaming!
How do I ensure proper ventilation and cooling for my arcade equipment?
Ventilation is key to keeping your arcade equipment running smoothly. I like to think of it as giving my machines a breath of fresh air. Make sure you’ve got some decent airflow in your gaming space, maybe even add some fans to keep things cool. Trust me, your consoles (and your players) will thank you!
Can I use modern gaming PCs or consoles in my retro-gaming arcade, or are older systems required?
Absolutely, you can use modern gaming PCs or consoles in your retro-gaming arcade, but where’s the fun in that? I say, mix it up! Use older systems for that authentic feel, and modern ones for convenience. Emulation is your friend, and with the right setup, you can have the best of both worlds – classic games on modern machines, and vintage systems for a true retro experience.