
I still remember the first time I tried to roll and cut pasta by hand. I was a culinary student, eager to learn the secrets of traditional Italian cooking. My instructor, a kind Italian nonna, guided me through the process, teaching me that with a little patience and practice, I could create delicious, homemade pasta that rivaled any store-bought variety. As I began to roll and cut pasta by hand, I realized that the process was not only therapeutic but also allowed me to connect with my food on a deeper level. The sensation of the dough beneath my fingers, the smell of fresh flour, and the sound of the pasta cutter gliding through the sheets all combined to create an experience that was both meditative and exhilarating.
In this article, I’ll share my honest, no-fuss approach to how to roll and cut pasta by hand. I’ll guide you through the process, from preparing the perfect dough to cutting the pasta into uniform strips. You’ll learn tips and tricks for achieving the perfect texture and consistency, as well as how to troubleshoot common issues that may arise. By the end of this guide, you’ll be equipped with the confidence and skills to create your own delicious, handmade pasta dishes that are sure to impress friends and family. Whether you’re a seasoned cook or a beginner in the kitchen, I invite you to join me on this culinary journey and discover the joy of rolling and cutting pasta by hand.
Table of Contents
- Guide Overview: What You'll Need
- Step-by-Step Instructions
- How to Roll and Cut Pasta by Hand
- Rolling with the Pros: 5 Tips for Hand-Rolled Pasta Perfection
- Three Essential Takeaways for Hand-Rolling Pasta
- The Heart of Homemade Pasta
- Rolling to Perfection: A Delicious Conclusion
- Frequently Asked Questions
Guide Overview: What You'll Need
Total Time: 1 hour 30 minutes
Estimated Cost: $10 – $20
Difficulty Level: Intermediate
Tools Required
- Rolling Pin (long and heavy)
- Sharp Knife (for cutting pasta)
- Pasta Cutting Tool (optional, but recommended)
- Clean Surface (for rolling and cutting pasta, approximately 6 feet long and 3 feet wide)
- Measuring Tape (or a ruler, for measuring pasta length, in inches)
Supplies & Materials
- All-Purpose Flour (for dusting surface)
- Homemade Pasta Dough (or store-bought, for rolling and cutting)
- Clean Towel (for drying pasta)
- Colander (for drying cut pasta, with holes approximately 1/4 inch in diameter)
Step-by-Step Instructions
- 1. First, let’s start by getting our ingredients and tools ready – we’ll need freshly made pasta dough, a clean and lightly floured surface, a rolling pin, and a sharp knife or pasta cutter. I like to use a wooden rolling pin that’s been passed down from my grandmother, it adds a touch of warmth and tradition to the process.
- 2. Next, divide your pasta dough into 4 equal pieces and work with one piece at a time. You can wrap the remaining pieces in plastic wrap to keep them fresh. Now, take the piece of dough you’re working with and flatten it slightly into a disk shape using your hands or the rolling pin. This will make it easier to roll out evenly.
- 3. Place the dough on your lightly floured surface and start rolling it out with your rolling pin. Apply gentle pressure at first, increasing it as needed. Remember to roll in all directions – up, down, left, right, and diagonally – to achieve an even thickness. You’re aiming for a thickness of about 1/16 inch for most pasta shapes.
- 4. As you roll, periodically lift and rotate the dough 90 degrees to ensure it doesn’t stick to the surface and to maintain evenness. If you find the dough starting to stick, lightly dust the surface with more flour. Don’t overdo it, though – too much flour can make the pasta taste dry.
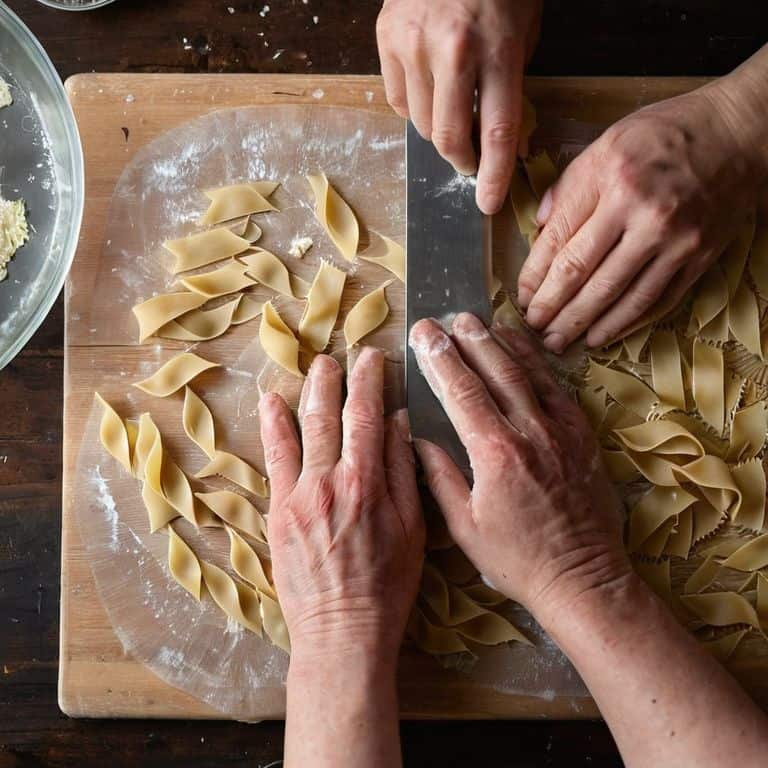
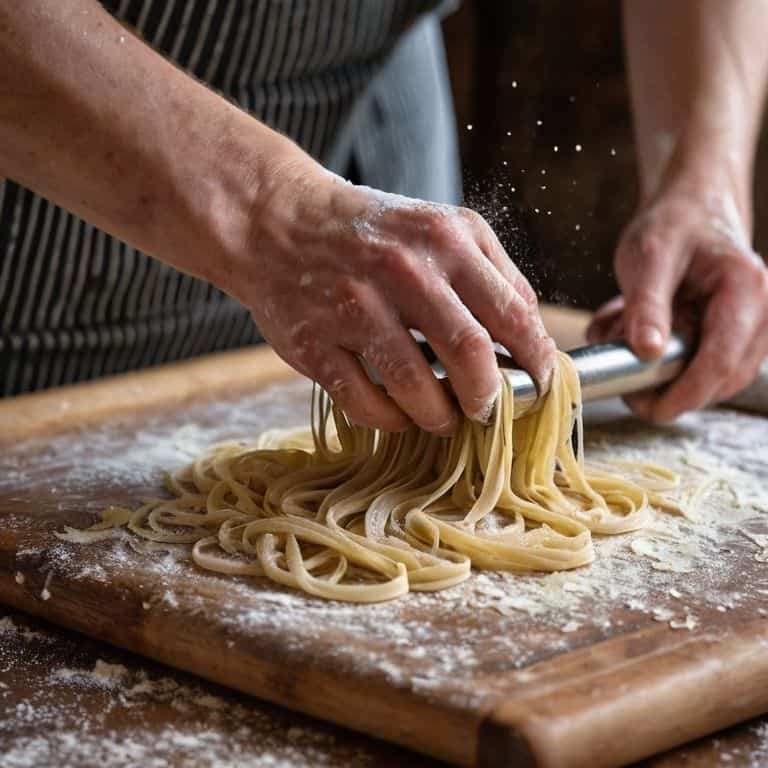
- 5. Once you’ve achieved your desired thickness, it’s time to cut your pasta. For spaghetti or angel hair, you can use a pasta cutter or a sharp knife. For other shapes like pappardelle or fettuccine, a sharp knife is your best bet. Cut with a smooth, gentle motion, applying even pressure. The key is to cut in one swift motion to avoid crushing or tearing the pasta.
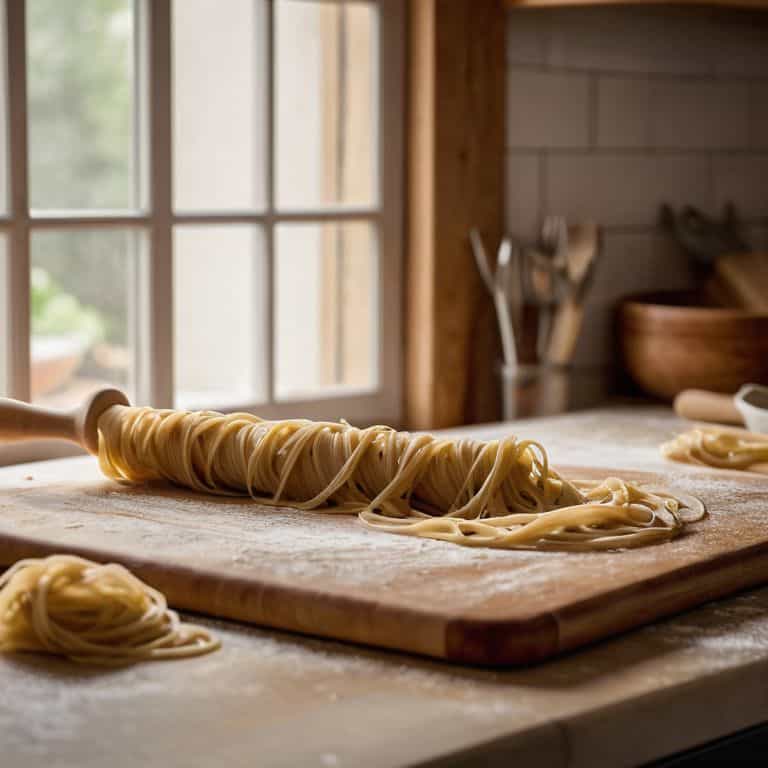
- 6. After cutting your pasta, gather it into nests or lay it out on a clean towel to dry slightly. This step is crucial for removing excess moisture, which can make your pasta clump together when cooking. If you’re not cooking your pasta immediately, you can also dry it further by hanging it over a clean broom handle or a pasta drying rack.
- 7. Finally, cook your freshly made pasta in a large pot of boiling, salted water. I like to add a tablespoon of olive oil to the water to prevent the pasta from sticking together. Cook until your pasta is al dente – it should still have a bit of bite to it. Then, drain and serve with your favorite sauce. The smell of freshly cooked pasta and the sound of sizzling sauce will fill your kitchen, making your mouth water in anticipation.
How to Roll and Cut Pasta by Hand
As I work with my pasta dough, I love experimenting with different hand rolled pasta techniques to achieve the perfect texture and shape. One of my favorite things to make is a classic homemade fettuccine recipe, which is surprisingly easy to master once you get the hang of it. To start, make sure your dough is well-rested and at room temperature, as this will make it much more pliable and easier to work with.
When it comes to cutting your pasta, a good pappardelle pasta cutting guide can be a lifesaver. I like to use a sharp knife or a pasta cutter to get clean, even cuts, and I always make sure to cut my pasta on a lightly floured surface to prevent it from sticking. For a more traditional look, you can also try using a no machine pasta making tips approach, where you cut your pasta into rough, rustic shapes by hand.
As you work on perfecting your traditional italian pasta shapes, don’t be afraid to get creative and try out new things. I love making different shapes and sizes of pasta to suit different sauces and dishes, and I’ve found that a good pasta dough recipe from scratch is the key to making it all work. With a little practice and patience, you’ll be making beautiful, delicious pasta like a pro in no time, and you can even invest in some hand cutting pasta tools to make the process easier and more enjoyable.
Mastering Hand Rolled Pasta Techniques
To truly master hand-rolled pasta, it’s all about feeling the dough come together beneath your fingers. I remember my nonna teaching me that the key is in the kneading – you want to develop that gluten so your pasta has a beautiful texture. As you work the dough, you’ll start to notice it becoming smoother, more elastic. That’s when you know you’re on the right track.
Now, let’s talk about the actual rolling. This is where patience comes in – you want to take your time, applying gentle pressure as you coax the dough into those perfect, delicate sheets. I like to think of it as a meditation, the rolling pin gliding back and forth, the dough yielding to your touch. With a little practice, you’ll be turning out gorgeous, hand-rolled pasta like a pro!
Unleash Homemade Fettuccine Secrets
Now that we’ve covered the basics, let’s dive into the secrets of making truly exceptional homemade fettuccine. For me, it’s all about the feel of the dough – you want it to be smooth and pliable, like playdough. To get to that point, I always make sure to knead the mixture for a good 10 minutes, until it starts to develop a lovely sheen. And don’t even get me started on the importance of using the right “00” flour – it makes all the difference in achieving that perfect texture.
As you roll out your dough, remember to take your time and enjoy the process. The key to getting those beautiful, delicate strands of fettuccine is to roll the pasta out to a thin, almost translucent sheet. Don’t be afraid to get a little aggressive with your rolling pin – you want to coax out that perfect texture. And when you finally cut your pasta, the satisfaction is unbeatable. There’s something so special about biting into a freshly made strand of fettuccine, knowing you crafted it with your own two hands.
Rolling with the Pros: 5 Tips for Hand-Rolled Pasta Perfection
- Use ’00’ flour for a more tender and pliable dough, it’s worth the extra trip to the Italian market, trust me!
- Keep your pasta dough at room temperature for at least 30 minutes before rolling to ensure it’s relaxed and easier to work with
- Don’t overwork the dough when kneading, you want to develop the gluten just enough to give it structure, but not so much that it becomes tough
- Use a sharp knife or pasta cutter to cut your fresh pasta, a dull blade will only lead to uneven edges and a frustrating experience
- Rest your freshly cut pasta on a clean towel or pasta drying rack for at least 30 minutes before cooking to allow excess moisture to evaporate, resulting in a better texture and less sticky noodles
Three Essential Takeaways for Hand-Rolling Pasta
Always remember to use ’00’ flour, as it has a finer texture that will help you achieve a smooth, pliable dough, perfect for rolling and cutting by hand
Never underestimate the power of resting your dough – letting it sit for at least 30 minutes allows the gluten to relax, making it easier to roll out to your desired thickness
Practice makes perfect, so don’t be discouraged if your first few attempts at hand-rolling pasta don’t yield uniform results – with time and patience, you’ll develop the skills and muscle memory to create beautiful, delicious homemade pasta
The Heart of Homemade Pasta
There’s something therapeutic about rolling and cutting pasta by hand – it’s not just about creating a meal, it’s about slowing down and connecting with the food, with the process, and with the people you’ll share it with.
Sophie Carter
Rolling to Perfection: A Delicious Conclusion
As we’ve discovered throughout this journey, rolling and cutting pasta by hand is an art that requires patience, practice, and a deep love for the process. We’ve uncovered the secrets of creating delicious homemade fettuccine, from mastering the dough to cutting it into perfect, silky strands. By following these steps and tips, you’ll be well on your way to becoming a pasta-making pro, capable of whipping up a mean spaghetti carbonara or tender fettuccine Alfredo in no time.
So, the next time you’re tempted to reach for store-bought pasta, remember the joy and satisfaction that comes from creating something with your own two hands. As you sit down to enjoy your freshly made pasta, savor the flavors and textures you’ve carefully crafted, and know that the love and effort you’ve put into it make all the difference. With a little practice, you’ll be hooked on handmade pasta and wondering how you ever settled for anything less.
Frequently Asked Questions
What's the best type of flour to use for making pasta from scratch?
For making pasta from scratch, I swear by ’00’ flour or all-purpose flour with a high protein content. The ’00’ flour gives a silky smooth texture, while the high protein content in all-purpose flour helps the pasta hold its shape. Trust me, it makes all the difference!
How do I know when the pasta dough is ready to be rolled out?
The moment of truth! You’ll know your pasta dough is ready when it’s smooth, elastic, and has a slight sheen to it. Give it a gentle press – if it springs back, it’s good to go! If not, give it a few more minutes of rest. Trust me, the wait is worth it for that perfect homemade fettuccine.
Can I use a pasta machine instead of rolling the pasta by hand, and will it affect the texture?
Absolutely, you can use a pasta machine! It’ll give you a more uniform texture, but I think there’s something special about hand-rolled pasta – it’s a bit more rustic and charming. If you do use a machine, just be gentle and don’t over-roll, or it can get too thin and delicate.