I still remember the first time I tried to make pancetta from scratch – I was a young bartender, obsessed with crafting the perfect cocktail, and I thought that making my own cured meats would be the key to unlocking new flavors. But every recipe I found for a simple pancetta recipe for beginners seemed to be shrouded in mystery, with vague instructions and intimidating ingredient lists. It wasn’t until I stumbled upon an old Italian cookbook that I discovered the truth: making pancetta is not about following a complicated formula, but about understanding the simple, timeless process of curing and aging meat.
As someone who’s spent years experimenting with homemade preservation techniques, I’m excited to share my experience with you and show you that making pancetta is totally accessible, even if you’re a complete beginner. In this article, I’ll walk you through my favorite simple pancetta recipe for beginners, and provide you with the kind of honest, hands-on advice that I wish I had when I first started out. We’ll cover everything from selecting the right ingredients to troubleshooting common mistakes, and by the end of it, you’ll be equipped with the knowledge and confidence to start curing your own meats at home.
Table of Contents
Recipe Details
Ingredients
- 1 cup diced pancetta (preferably from an Italian market)
- 1/4 cup brown sugar (optional, for a sweet and savory flavor)
- 1/4 cup pink peppercorns (optional, for extra flavor)
- 1/4 cup black peppercorns
Tools & Supplies
- Large skillet
- Cutting board
- Chef's knife
Recipe Instructions
Step 1
First, let’s start with the basics: we need to cure our pancetta. In a small bowl, mix together 1 cup of kosher salt, 1/2 cup of brown sugar, 2 tablespoons of pink curing salt, and 2 tablespoons of black pepper. Yes, it’s a lot of salt, but trust me, it’s necessary for that perfect flavor profile. Now, take your pork belly, which should be about 2 pounds, and rub the cure all over it, making sure to cover every inch.
Step 2
Next, we need to let the magic happen. Place the cured pork belly on a wire rack set over a rimmed baking sheet or a tray, and let it air dry in the fridge for at least 7 days. Every day or two, massage the meat and turn it over, making sure it’s coated evenly. This step is crucial, as it allows the cure to penetrate the meat and helps to develop that amazing pancetta flavor.
Step 3
After 7 days, it’s time to rinse off the cure. Remove the pork belly from the fridge and rinse it under cold running water to remove the excess salt and sugar. Then, pat it dry with paper towels, making sure to get it as dry as possible. This helps the pancetta to develop a nice crust when it’s cooked.
Step 4
Now, it’s time to add some extra flavor to our pancetta. In a small bowl, mix together 2 tablespoons of black pepper, 2 tablespoons of coriander seeds, and 2 tablespoons of garlic, minced. Rub this mixture all over the pork belly, making sure to coat it evenly. You can also add other ingredients like fresh herbs or spices to give it your own unique twist.
Step 5
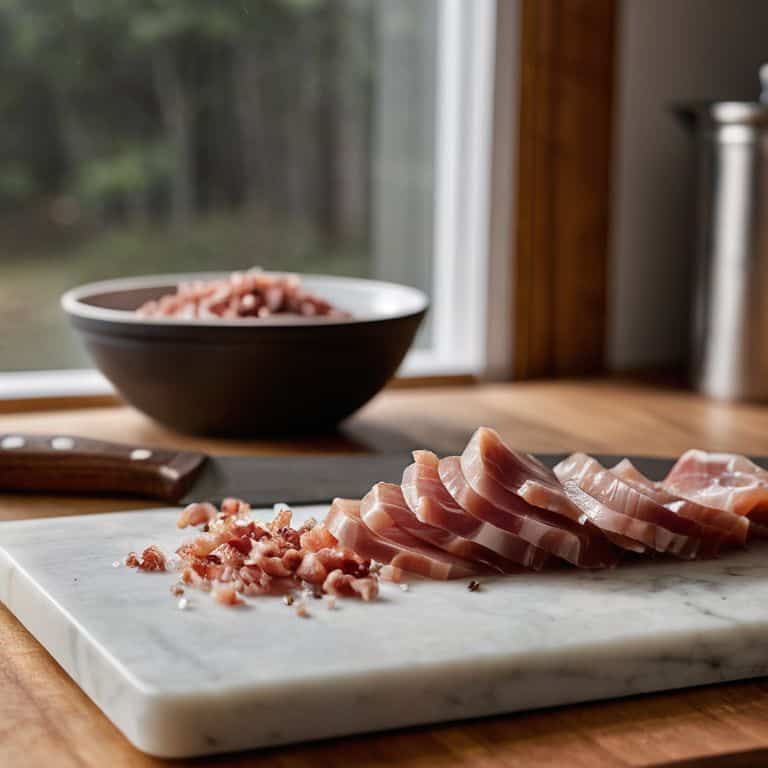
Finally, it’s time to hang and age our pancetta. If you have a way to hang it, like a hook or a rope, you can hang it in a cool, dry place. If not, you can place it on a wire rack set over a rimmed baking sheet or a tray. Let it age for at least 2 weeks, or up to 6 weeks for a more intensely flavored pancetta. Every few days, check on it and make sure it’s not developing any off smells or mold. Once it’s ready, you can slice it thin and enjoy it in your favorite dishes.
A Simple Pancetta Recipe for Beginners
As I delve into the world of homemade italian bacon, I’m reminded of the rich history behind this beloved ingredient. Pancetta, with its delicate balance of salt, spice, and fat, has been a staple in Italian cuisine for centuries. When it comes to curing pork belly at home, it’s essential to understand the importance of patience and precision. A good pancetta is not just about tossing some spices on a piece of meat, but about coaxing out the deep, unctuous flavors that make it truly special.
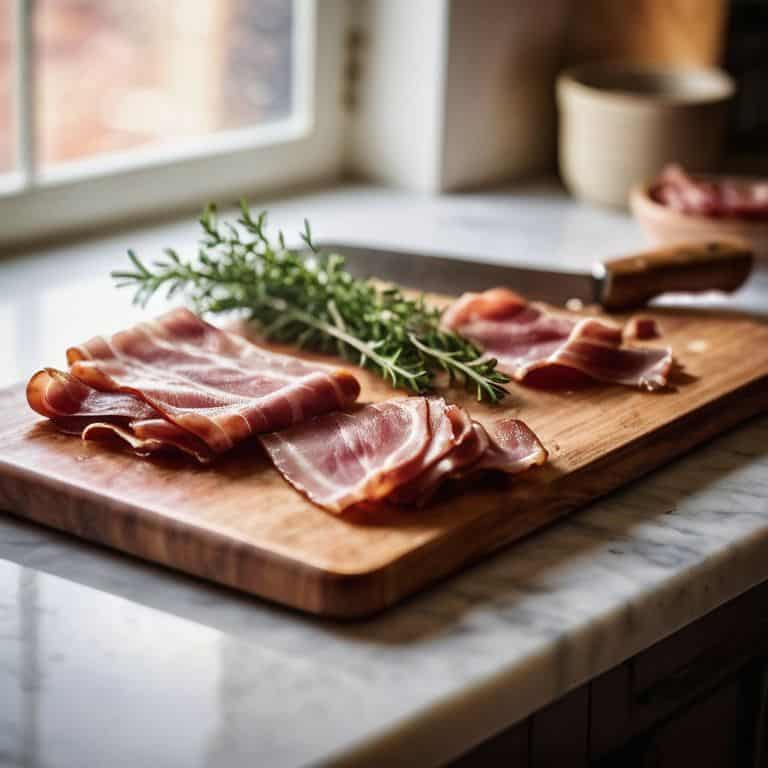
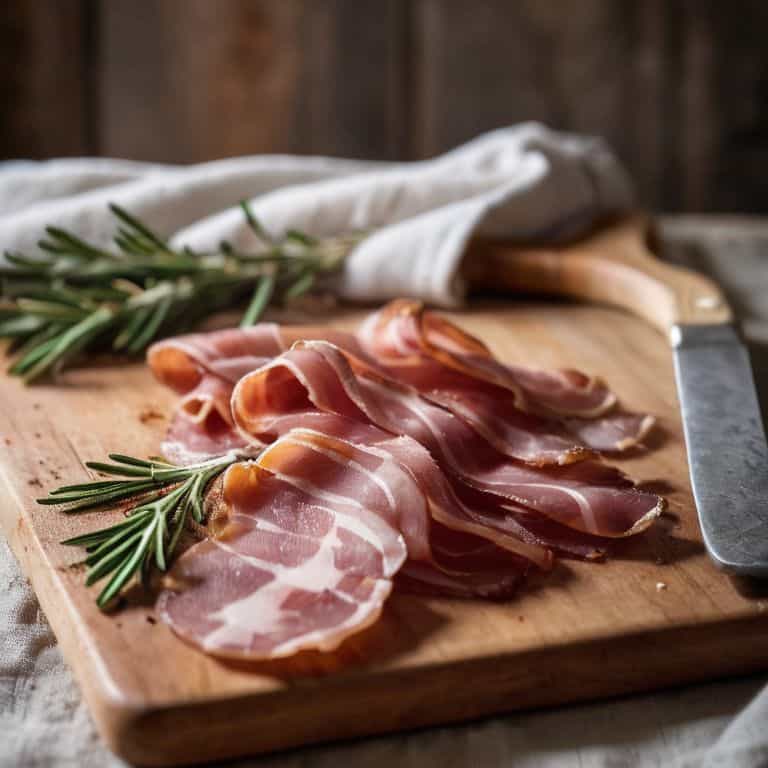
One of the most critical aspects of making great pancetta is mastering the simple spice blends that give it its characteristic flavor. I like to experiment with different combinations of black pepper, coriander, and rosemary to create a unique profile that complements the richness of the pork. When it comes to pancetta wrapping techniques, I’m a firm believer in keeping things simple – a tight wrap in cheesecloth or plastic wrap is all you need to ensure that your pancetta ages evenly and develops that gorgeous, velvety texture.
As your pancetta ages, you’ll start to notice the flavors melding together in a beautiful, harmonious way. Aging pancetta for flavor is an art that requires patience, but trust me, the end result is well worth the wait. With a little practice and experimentation, you’ll be creating easy pancetta recipes that will impress even the most discerning palates. Whether you’re using it to add depth to a pasta dish or as a topping for a crisp pizza, your homemade pancetta is sure to become a staple in your kitchen.
Curing Pork Belly at Home With Ease
Curing pork belly at home is where the magic happens. It’s all about coaxing out that rich, unctuous flavor that makes pancetta so irresistible. I like to think of it as a slow dance between the meat, salt, and time. You’ll want to make sure your pork belly is coated in a mixture of kosher salt, pink curing salt, and a pinch of sugar – don’t worry, it’s easier than it sounds! Just remember, the key is to be generous with the cure, making sure every inch of that beautiful belly is covered.
As the days pass, you’ll start to notice the pork belly transforming into something truly special. The cure will draw out moisture, concentrating the flavors and setting the stage for a tender, crispy finish. It’s a waiting game, but trust me, it’s worth it. I love checking on my curing projects, feeling like a kid on Christmas morning, anticipating the deliciousness that’s to come.
Simple Spice Blends for Delicious Homemade Italian Bacon
Now that we’ve got our pancetta curing, let’s talk about the magic that happens with simple spice blends. I’m a firm believer that the right mix of spices can elevate your homemade Italian bacon to the next level. For me, it’s all about balancing the bold, savory flavors of the pork with a hint of warmth and depth. I like to keep things straightforward with a classic blend of black pepper, pink peppercorns, and a pinch of nutmeg. The key is to taste as you go and adjust the seasoning to your liking – after all, that’s the beauty of making it yourself!
I’ve also been known to experiment with other ingredients like coriander, allspice, and even a drizzle of honey to add a touch of sweetness. The possibilities are endless, and I encourage you to get creative and find the perfect blend that makes your taste buds sing. Remember, the spice blend is where you can really put your own stamp on the recipe and make it truly unique.
Get It Just Right: 5 Essential Tips for a Simple Pancetta Recipe

- Start with the right cut of meat: Look for a pork belly with a good balance of fat and lean meat for the perfect pancetta
- Don’t overcomplicate the cure: Stick to a simple blend of salt, sugar, and black pepper to let the natural flavors of the pork shine through
- Keep it cool and patient: Curing pancetta is a waiting game, so make sure you’ve got a cool, draft-free spot to let it do its thing
- Massage that meat: Give your pork belly a good rubdown with the cure to ensure everything gets evenly coated and you get that beautiful, tender texture
- Slice it thin and serve with love: Once your pancetta is cured and ready, slice it up thin and serve it with some crusty bread, fresh veggies, or as part of a charcuterie board for a real showstopper
Kickstarting Your Pancetta Journey: 3 Essential Takeaways
By following a simple pancetta recipe, you can create deliciously cured Italian bacon at home, perfect for elevating your pasta dishes, pizzas, and salads to the next level
With a few basic spices and some patience, you can experiment with unique flavor profiles, from classic black pepper and rosemary to more adventurous combinations like garlic and thyme
Remember, the key to successful pancetta is in the curing process – don’t be afraid to get creative, try new things, and most importantly, have fun making your own homemade Italian bacon from scratch
The Beauty of Homemade Pancetta
There’s something magical about transforming a simple pork belly into a deliciously complex, melt-in-your-mouth pancetta – it’s a reminder that with a little patience and the right ingredients, we can create truly extraordinary flavors in our own kitchens.
Tom Navarro
Bringing Home the Bacon: Conclusion
With our simple pancetta recipe for beginners, you’ve learned how to cure pork belly at home and create your own simple spice blends for a delicious homemade Italian bacon experience. From the initial preparation to the final curing process, we’ve walked through each step together, ensuring that you feel confident in your ability to produce a high-quality, mouth-watering pancetta. Whether you’re a seasoned chef or a culinary newbie, the process of creating something from scratch is not only fulfilling but also allows for a deeper connection with the food you eat. By embracing this DIY approach, you’re not just making pancetta – you’re reviving old-school preservation techniques and fostering a sense of community with like-minded individuals who value the art of handmade cuisine.
As you slice into your freshly cured pancetta for the first time, remember that the true magic lies not in the destination, but in the journey of creation. The act of making your own food from scratch is a powerful statement – it’s about taking control of what you eat, supporting local and seasonal ingredients, and sharing in the joy of handmade, artisanal produce. So, don’t be afraid to get creative and experiment with new flavors and ingredients. Your pantry, and your taste buds, will thank you. Happy cooking, and I look forward to seeing what delicious creations you come up with next!
Frequently Asked Questions
What is the ideal thickness for slicing pancetta to get the perfect balance of crunch and flavor?
For me, the sweet spot is around 1/8 inch thick – any thinner and it’s too crispy, any thicker and it’s too chewy. But honestly, it’s all about feel, so slice it up and see what works best for you!
Can I use alternative types of pork or meat for making pancetta if pork belly is not available?
Absolutely, don’t be limited by pork belly! You can experiment with other cuts like pork shoulder or even lamb belly. Just keep in mind the fat content and adjust your curing time accordingly. I’ve even had success with wild boar and venison, so don’t be afraid to get creative and see what delicious flavors you can uncover!
How do I know when my homemade pancetta is properly cured and safe to eat?
Ah, the million-dollar question! For me, it’s all about the feel and smell. When your pancetta is properly cured, it should be firm to the touch, with a nice sheen to it. Give it a sniff – it should have a rich, savory aroma. If it’s still soft or smells off, give it a few more days. Trust your instincts, and don’t be afraid to get a little hands-on!