
I still remember the day I realized that my kitchen pantry was holding me back from becoming the cook I wanted to be. I was struggling to find ingredients, and my countertops were cluttered with spices and cooking essentials. That’s when I discovered the power of a guide to pull-out pantry shelves. It was like a weight had been lifted off my shoulders – I could finally see what I had, and everything had its own designated spot. As I delved deeper into the world of kitchen design, I learned that it’s not just about having a big space, but about creating a functional workflow that makes cooking a joy.
In this article, I’ll share my expertise on how to create a kitchen sanctuary that inspires better cooking. You’ll learn how to choose the right pull-out pantry shelves for your space, and how to optimize your kitchen’s layout for maximum efficiency. I’ll provide you with practical tips and tricks for implementing a pull-out pantry system that works for you, regardless of your budget or kitchen size. Whether you’re a seasoned chef or a culinary newbie, this guide will help you transform your kitchen into a haven of organization and productivity, making it easier to cook with joy and effortless elegance.
Table of Contents
- Guide Overview: What You'll Need
- Step-by-Step Instructions
- A Guide to Pull Out Pantry Shelves
- 5 Essential Tips to Elevate Your Pull-Out Pantry Shelf Experience
- Key Takeaways for a Dream Pantry
- The Pantry Epiphany
- Bringing it all Together: The Power of Pull-Out Pantry Shelves
- Frequently Asked Questions
Guide Overview: What You'll Need
Total Time: 4 hours 30 minutes
Estimated Cost: $100 – $300
Difficulty Level: Intermediate
Tools Required
- Circular Saw (for cutting lumber)
- Drill Press (for precise drilling)
- Hand Saw (or a jigsaw for curved cuts)
- Screwdriver (flathead and Phillips)
- Tape Measure (for accurate measurements)
- Level (to ensure shelves are level)
- Clamp (for holding shelves in place)
- Socket Wrench (for tightening bolts)
Supplies & Materials
- 3/4-in plywood (for shelves)
- 2-in x 4-in lumber (for frame and supports)
- 1-in x 4-in lumber (for shelf trim)
- Screws (2 1/2 inches and 1 1/4 inches)
- Hinges (for attaching shelves to the frame)
- Sliding hardware (for smooth shelf movement)
- Wood glue (for bonding wood pieces)
- Sandpaper (for smoothing out wood surfaces)
- Paint or stain (optional, for finishing the shelves)
Step-by-Step Instructions
- 1. First, assess your kitchen space to determine the ideal location for your pull-out pantry shelves. Consider the kitchen work triangle and how the new shelves will interact with your existing workflow. Think about the path you take most often when cooking and how the shelves can enhance your movement.
- 2. Next, measure your available space carefully, taking note of any obstructions like plumbing or electrical outlets. Decide on the optimal width and height for your pull-out pantry shelves, considering the items you plan to store and the frequency of access. For maximum efficiency, I recommend storing your most-used items at waist level.
- 3. Choose the right materials for your shelves, balancing durability with aesthetic appeal. I’m a fan of using solid wood or high-quality laminates that can withstand the wear and tear of daily use. Consider the style and finish of your existing kitchen cabinets and appliances to ensure a cohesive look.
- 4. Plan the layout of your shelves to maximize storage and visibility. I suggest grouping similar items together, such as baking supplies or canned goods, and using adjustable dividers to customize the space as needed. Don’t forget to leave some breathing room between items to prevent clutter and make it easier to find what you need.
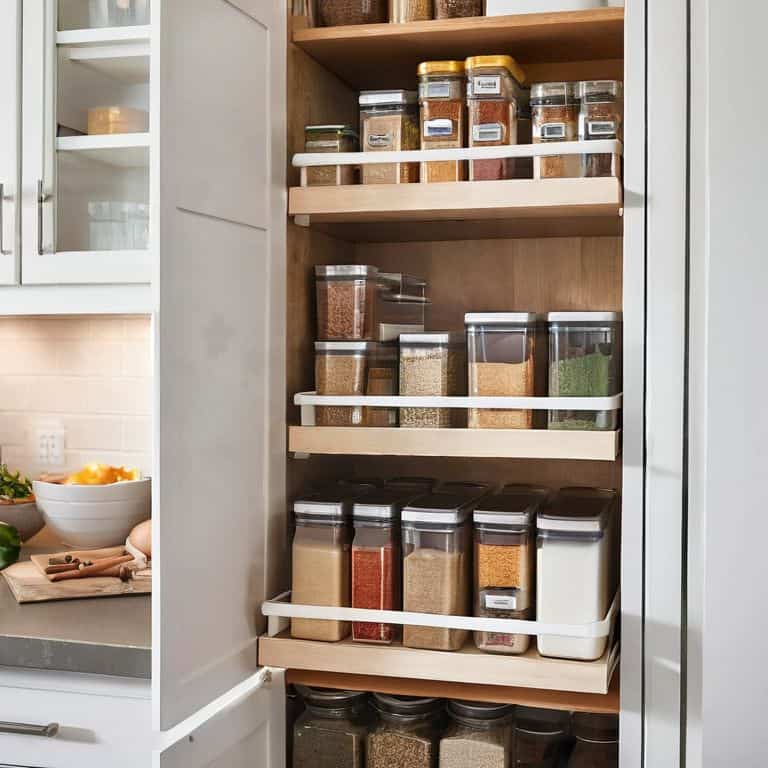
- 5. Select a reliable sliding mechanism that can support the weight of your stored items. I recommend investing in high-quality rollers or soft-close slides to ensure smooth, quiet operation. Consider adding stop mechanisms to prevent the shelves from extending too far and to keep them stable when loaded.
- 6. Consider customization options to tailor your pull-out pantry shelves to your specific needs. You might add spice racks, wine holders, or basket inserts to keep small items organized and within reach. I also love incorporating decorative trim or molding to give the shelves a polished, finished look.
- 7. Finally, install your pull-out pantry shelves with care, following the manufacturer’s instructions or consulting a professional if needed. Take the time to test and adjust the shelves to ensure they’re functioning smoothly and meet your expectations. With your new pull-out pantry shelves in place, you’ll be amazed at how much more efficient and enjoyable cooking can be.
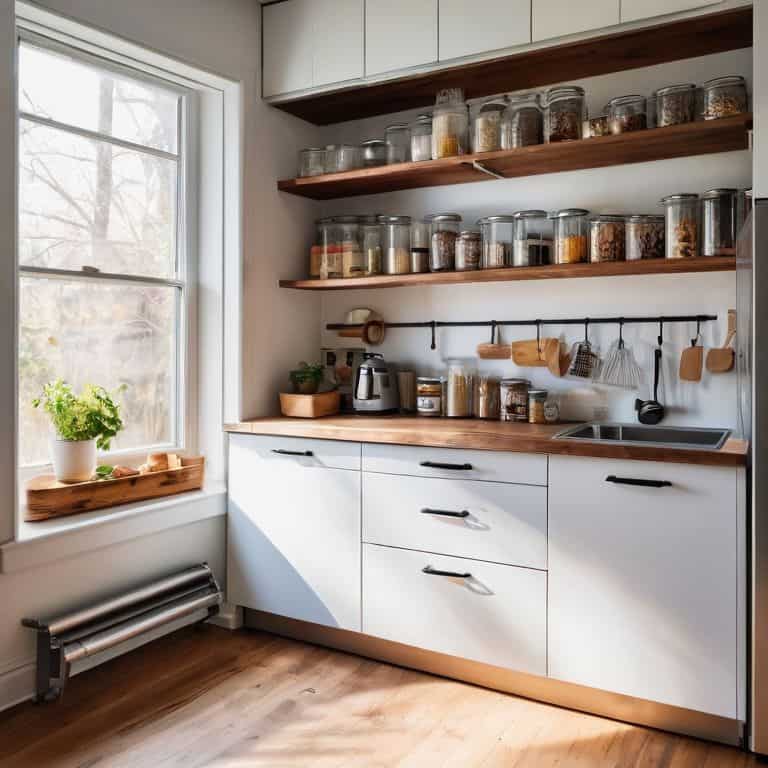
A Guide to Pull Out Pantry Shelves
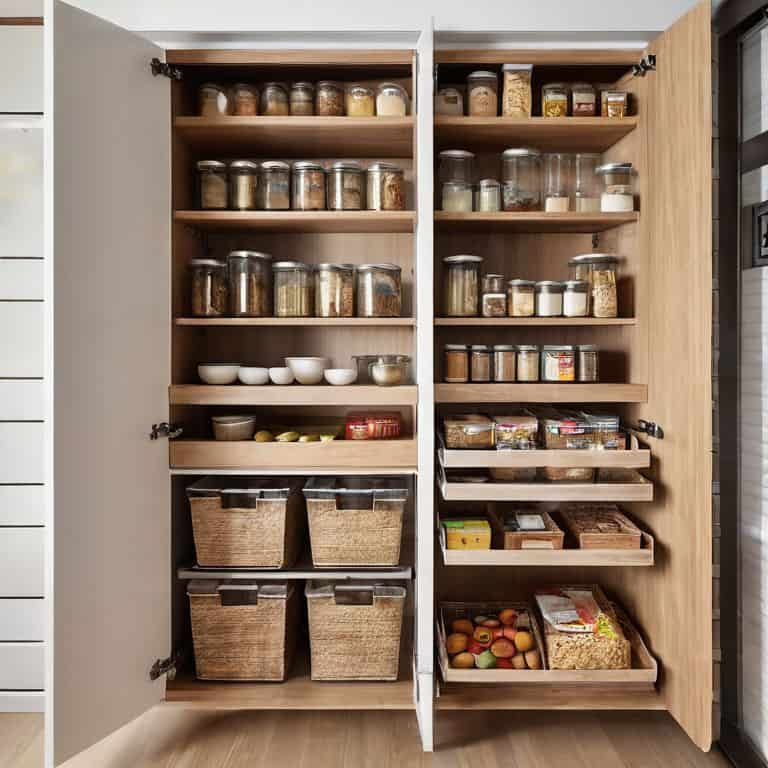
As I delve into the world of pantry organization, I’m reminded of the importance of maximizing pantry storage space. It’s not just about having a lot of shelves, but about creating a system that works for you. I’ve seen many kitchens benefit from custom pantry shelf designs that cater to the homeowner’s specific needs. For instance, a pantry with adjustable shelving systems can make a huge difference in storing items of various sizes.
When it comes to implementing pull-out shelves, it’s essential to consider the pull out shelf hardware that will be used. This can make or break the functionality of your pantry. I’ve found that investing in high-quality hardware can save you a lot of hassle in the long run. Additionally, DIY pantry organization ideas can be a great way to add a personal touch to your pantry without breaking the bank.
To take your pantry to the next level, consider a kitchen pantry makeover. This can involve everything from repainting the walls to installing new shelving systems. By incorporating adjustable pantry shelving systems, you can create a space that is both beautiful and functional. Remember, the key to a well-organized pantry is to create a system that is easy to maintain and maximizing pantry storage space is crucial to achieving this goal.
Diy Pantry Makeover With Adjustable Shelving
I love a good DIY project, and giving your pantry a makeover with adjustable shelving is a great way to breathe new life into your kitchen. By installing adjustable shelves, you can customize your pantry to fit your unique needs and store your favorite ingredients in a way that makes sense for you. Whether you’re a spice enthusiast or a baking aficionado, adjustable shelving allows you to create a system that works with your cooking style.
With adjustable shelving, you can easily switch up your pantry’s layout as your cooking habits evolve. Plus, it’s a budget-friendly way to give your pantry a high-end feel. I’ve seen it work wonders in even the smallest of spaces, making it a total game-changer for home cooks like myself.
Maximizing Space With Custom Shelf Designs
When it comes to maximizing space, custom shelf designs can be a total lifesaver. I love working with clients to create bespoke pull-out pantry shelves that fit their unique kitchen layout and storage needs. By tailoring the shelves to the exact dimensions of the space, we can squeeze out every last inch of storage potential. Plus, custom designs allow us to get creative with features like adjustable dividers, spice racks, and even built-in wine storage.
For my own kitchen, I opted for a custom pull-out shelf with a built-in basket for storing fresh produce. It’s been a game-changer for keeping my countertops clutter-free and making healthy snacks easily accessible. Whether you’re working with a compact urban kitchen or a spacious suburban spread, custom shelf designs can help you make the most of your pantry space and create a cooking environment that’s both beautiful and functional.
5 Essential Tips to Elevate Your Pull-Out Pantry Shelf Experience
- Measure Your Space Like a Pro: Before installing pull-out pantry shelves, take precise measurements of your kitchen to ensure a seamless fit and maximum storage capacity
- Choose the Right Materials for Durability and Style: Select materials that not only complement your kitchen aesthetic but also withstand the wear and tear of frequent use, such as sturdy wood or sleek metal
- Optimize Your Shelf Layout for Efficiency: Consider the ‘kitchen work triangle’ when designing your pull-out pantry shelves to create a harmonious workflow that simplifies meal prep and cooking
- Incorporate Smart Storage Solutions for a Clutter-Free Kitchen: Invest in baskets, bins, or dividers to keep your pull-out pantry shelves organized, making it easier to find what you need when you need it
- Lighting Makes All the Difference: Install LED strips or under-shelf lighting to illuminate your pull-out pantry shelves, creating a warm ambiance and making it easier to navigate your kitchen, even in the evening hours
Key Takeaways for a Dream Pantry
I’m a huge fan of incorporating pull-out pantry shelves to create a seamless cooking experience, and with a little creativity, you can maximize your kitchen’s storage potential regardless of its size
Customizing your shelf designs to fit your specific cooking needs is a total game-changer – think about the types of ingredients you use most often and design your storage around them for a more efficient workflow
Whether you’re a DIY enthusiast or working with a designer, the right pantry shelving can make all the difference in your cooking joy – so don’t be afraid to get creative and make your pantry a reflection of your personal style
The Pantry Epiphany
A well-designed pull-out pantry shelf is not just a storage solution, it’s a culinary liberation – freeing you to focus on the art of cooking, rather than the chaos of clutter.
Clara Wu
Bringing it all Together: The Power of Pull-Out Pantry Shelves
As we’ve explored in this guide to pull-out pantry shelves, the key to a functional kitchen lies in maximizing space and optimizing workflow. From custom shelf designs to DIY pantry makeovers with adjustable shelving, the options are endless for creating a kitchen that truly works for you. By implementing these strategies, you’ll be able to streamline your cooking process, reduce clutter, and make the most of your kitchen’s potential. Whether you’re a seasoned chef or a culinary newbie, a well-designed pantry is the foundation upon which all great meals are built.
So, as you embark on your own kitchen transformation journey, remember that it’s all about creating a space that inspires you to cook with joy. Don’t be afraid to think outside the box, get creative with your design, and prioritize the features that matter most to you. With a little patience, planning, and attention to detail, you’ll be whipping up delicious meals in no time, surrounded by a kitchen that’s as beautiful as it is functional. Happy cooking, and happy designing!
Frequently Asked Questions
What are the most common materials used for pull-out pantry shelves and how do they impact durability?
I just love exploring the world of materials for pull-out pantry shelves. Common choices include sturdy wood, sleek metal, and durable MDF. Each material brings its own unique blend of style and durability to the table, with wood offering a warm, natural look and metal providing a sleek, modern vibe.
How can I determine the ideal width and depth for my pull-out pantry shelves to maximize storage?
To determine the ideal width and depth for your pull-out pantry shelves, measure your most-used items, like canned goods and kitchen staples. Consider the height of your pantry and the space between shelves. I like to leave about 3-5 inches between shelves for easy access and to prevent clutter from building up.
Are there any specific hardware or mechanism recommendations for smooth and quiet operation of pull-out pantry shelves?
I swear by soft-close drawer slides and high-quality rollers for silky-smooth operation. For added quiet, consider using felt or silicone bumpers on the shelves. These little details make all the difference in creating a serene kitchen experience.