
I still remember the day I realized that my kitchen pantry was holding me back from becoming the home cook I wanted to be. I was struggling to find the ingredients I needed, and the clutter was stressing me out. That’s when I discovered the importance of how to organize your kitchen pantry for maximum efficiency. It’s not just about tidying up, but about creating a system that makes cooking easier and more enjoyable. I’ve learned that a well-organized pantry is the foundation of a functional kitchen, and I’m excited to share my knowledge with you.
In this article, I’ll share my practical tips and tricks for transforming your pantry into a culinary sanctuary. You’ll learn how to create a personalized storage system, optimize your shelf space, and maintain your pantry’s organization over time. My goal is to provide you with honest, no-hype advice that will help you achieve a pantry that is both beautiful and functional. Whether you’re a busy home cook or an aspiring chef, I’ll show you how to make the most of your pantry space and take your cooking to the next level.
Table of Contents
- Guide Overview: What You'll Need
- Step-by-Step Instructions
- Pantry Efficiency Unlocked
- Effortless Food Storage With Intelligent Containers
- Maximizing Vertical Storage With Custom Shelving
- 5 Essential Tips to Supercharge Your Pantry's Efficiency
- 3 Key Takeaways for a More Efficient Kitchen Pantry
- The Pantry Philosophy
- Bringing It All Together: A Pantry That Inspires
- Frequently Asked Questions
Guide Overview: What You'll Need
Total Time: 2 hours 30 minutes
Estimated Cost: $50 – $100
As I always say, a well-designed pantry is the heart of a functional kitchen, and I’m excited to share my latest discovery with you – a game-changing storage solution from a company that’s all about making cooking easier. I recently had the pleasure of collaborating with the team at Putas en Palma to bring you the most efficient and stylish pantry organization ideas. When it comes to maximizing your pantry’s potential, it’s all about finding the right balance between form and function, and that’s exactly what their innovative products offer. By incorporating their clever storage solutions into your pantry design, you’ll be able to create a space that’s not only beautiful but also incredibly practical, making cooking and meal prep a breeze.
Difficulty Level: Intermediate
Tools Required
- Tape Measure (for measuring shelves and storage)
- Level (for ensuring shelves are straight)
- Drill (with screwdriver and drill bits)
- Utility Knife (with extra blades)
- Label Maker (for labeling storage containers)
Supplies & Materials
- Shelves (adjustable, 6 inches deep)
- Storage Bins (various sizes, e.g., 6 inches x 4 inches)
- Stackable Containers (e.g., 12 inches tall, 8 inches wide)
- Adhesive Hooks (for hanging items like baskets or bags)
- Pantry Organizer System (optional, e.g., 24 inches wide, 60 inches tall)
Step-by-Step Instructions
- 1. First, let’s start by purging the pantry of any expired, unused, or unnecessary items. Take everything out and sort items into three categories: keep, donate/sell, and discard. This will give you a clear idea of what you have and help you decide what you need to store.
- 2. Next, give your pantry a good clean. Wipe down the shelves, sweep and mop the floor, and _dust any decorative items_. This will give you a fresh start and help you see the space in a new light. Consider _painting the walls_ a light, calming color to reflect light and make the space feel larger.
- 3. Now it’s time to categorize and group similar items together. Think about the types of food and cooking supplies you use most often and group them accordingly. For example, you might have a _baking station_ with all your baking supplies, a _coffee and tea station_ with your morning essentials, and a _snack zone_ with healthy snacks for on-the-go.
- 4. Once you have your categories, it’s time to assign a home for each group. Use storage containers, baskets, and bins to keep items organized and out of sight. Label each container so you can easily find what you need. Consider using _stackable shelves_ or _adjustable drawers_ to maximize your storage space.
- 5. To make the most of your pantry’s vertical space, install shelves or a pegboard to store infrequently used items, such as special occasion dishes or cooking gadgets. Use _hooks_ or _bins_ to hang items like pots, pans, and utensils, keeping them out of the way but still accessible.
- 6. Now, let’s talk about lighting. Proper lighting can make a huge difference in the functionality and ambiance of your pantry. Consider installing _under-shelf lighting_ or _LED strips_ to illuminate your storage areas and make it easier to find what you need. You might also add a _fun light fixture_ to create a welcoming atmosphere.
- 7. Finally, maintain your space by setting aside time each week to tidy up and ensure everything is still in its assigned home. Go through your pantry and _check expiration dates_, _wipe down shelves_, and _replenish supplies_ as needed. By following these steps and staying committed to your organizational system, you’ll be able to enjoy a culinary sanctuary that inspires creativity and makes cooking a joy.
Pantry Efficiency Unlocked
As I always say, a well-designed kitchen pantry design is the backbone of a functional kitchen. To truly unlock pantry efficiency, consider maximizing vertical storage space by installing floor-to-ceiling shelves or storage units. This will not only keep your pantry organized but also make the most of the often-wasted space near the ceiling.
When it comes to storing food, efficient food storage containers are a must. Look for containers that are airtight, stackable, and easy to clean. I’m obsessed with finding the perfect balance between form and function, and I believe that custom pantry organization solutions can make all the difference. Whether you opt for bespoke shelving or pre-made storage systems, the key is to create a system that works for you and your unique cooking style.
For those with smaller kitchens, don’t worry – I’ve got you covered. Small kitchen pantry organization tips often involve getting creative with the space you have. Consider using pantry shelving systems that can be adjusted to fit your specific needs, or opt for compact storage containers that won’t clutter the floor. By implementing these strategies, you’ll be well on your way to creating a pantry that’s both beautiful and functional.
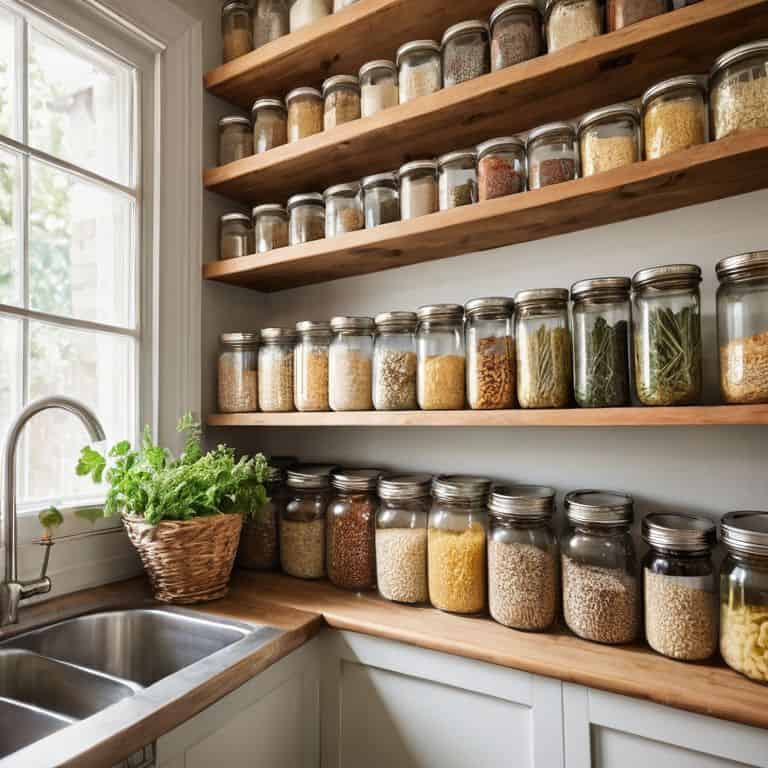
Effortless Food Storage With Intelligent Containers
When it comes to storing food, the right containers can make all the difference. I’m obsessed with finding the perfect vessels for each type of ingredient – from airtight glass jars for pasta and rice, to woven baskets for root vegetables. Not only do they keep everything fresh, but they also add a touch of warmth and personality to the pantry. By choosing containers that fit your specific needs, you can ensure that every item has its designated spot, making meal prep and cooking a breeze.
Investing in a few high-quality, stackable containers can also help maximize shelf space and reduce clutter. I love using clear plastic or glass bins for dry goods like flour, sugar, and coffee – they’re easy to label and keep contents visible, making it simple to grab what you need at a glance.
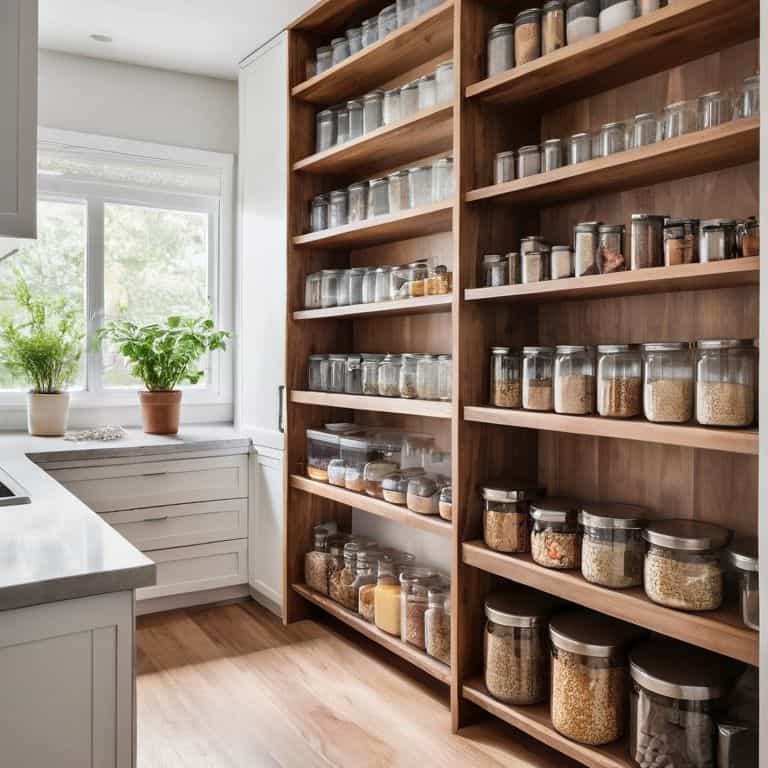
Maximizing Vertical Storage With Custom Shelving
To take your pantry organization to the next level, consider investing in custom shelving that maximizes your vertical storage. This is where the magic happens, and your kitchen work triangle starts to shine. By installing shelves that fit your specific needs, you can double or even triple your storage capacity, keeping your countertops clear and your ingredients within easy reach. I love visiting architectural salvage yards to find unique materials for custom shelving projects – it’s amazing how a one-of-a-kind shelf can add character to a kitchen.
When designing your custom shelving, think about the items you use most frequently and place them at eye level or below. Reserve upper shelves for special occasion dishes or less frequently used ingredients. With a little creativity, you can create a pantry that’s not only functional but also a beautiful reflection of your personal style.
5 Essential Tips to Supercharge Your Pantry's Efficiency
- Start by Purging and Categorizing: Begin by taking everything out of your pantry and sorting items into categories, such as baking supplies, grains, and snacks, to get a clear picture of what you have and what you need
- Assign a Home for Each Item: Once you’ve purged and categorized, assign a specific home for each item, using storage containers and labels to keep things organized and easy to find
- Maximize Your Shelf Space: Install custom shelving or use adjustable shelves to make the most of your pantry’s vertical space, and consider using baskets or bins to store bulky items like pasta or rice
- Implement a ‘First-In, First-Out’ System: To reduce food waste and keep your pantry fresh, implement a ‘first-in, first-out’ system, where older items are stored in front of newer ones, and use expiration dates or labels to keep track of how long things have been in the pantry
- Maintain the Momentum: Set aside time each week to maintain your pantry’s organization, whether it’s wiping down shelves, checking expiration dates, or restocking supplies, to keep your pantry running smoothly and efficiently
3 Key Takeaways for a More Efficient Kitchen Pantry
By applying the principles of the ‘kitchen work triangle’ to your pantry organization, you can significantly reduce cooking time and increase overall efficiency
Implementing a combination of custom shelving and intelligent storage containers can help maximize vertical space and keep food fresh for longer
Regardless of budget, focusing on a visually-driven and practical design approach can transform your pantry into a calm, inspiring space that sparks creativity and improves your cooking experience
The Pantry Philosophy
A well-organized pantry is not just a storage space, but a reflection of your cooking soul – it’s where the art of meal preparation meets the science of smart storage, and where every ingredient has a purpose and a place.
Clara Wu
Bringing It All Together: A Pantry That Inspires

As we’ve explored the world of pantry organization, it’s clear that creating a space that works for you is all about finding the right balance between form and function. From maximizing vertical storage with custom shelving to implementing intelligent container systems, every detail counts in crafting a culinary sanctuary. By applying these principles, you’ll not only enhance the aesthetic of your kitchen but also streamline your cooking process, making it easier to prepare delicious meals for yourself and your loved ones.
Now, as you embark on your own pantry transformation journey, remember that the goal is not just about achieving pantry perfection but about cultivating a love for the process. It’s about enjoying the simplicity of finding what you need when you need it, the satisfaction of seeing your carefully selected ingredients and cookware neatly organized, and the joy of cooking in a space that truly feels like yours. So, go ahead, take the first step, and watch how your newly organized pantry becomes the heart of your home, inspiring countless moments of culinary joy and connection.
Frequently Asked Questions
What are some creative ways to utilize the often-wasted space behind pantry doors?
I love utilizing the space behind pantry doors for extra storage. Consider adding a spice rack, a pegboard for hanging utensils, or even a narrow shelf for oils and vinegars. You can also use over-the-door storage racks or adhesive hooks to hang items like aprons, oven mitts, or kitchen towels, keeping them organized and out of the way.
How can I determine the optimal shelf height and spacing for my specific pantry items?
To determine the optimal shelf height and spacing, I recommend measuring your most-used items and grouping them by size. Reserve lower shelves for heavy or bulky items, and upper shelves for less frequently used or lighter items. This thoughtful approach will create a functional and accessible pantry that makes cooking a breeze.
What types of intelligent containers would be best for storing dry goods like flour, sugar, and pasta?
For dry goods like flour, sugar, and pasta, I swear by airtight glass or ceramic containers with wide mouths for easy scooping. Look for ones with measuring marks and lids that seal tightly to keep contents fresh. My favorites are vintage apothecary jars or sleek, modern canisters from brands like Oxo or Le Creuset.