I still remember the first time I tried Suminagashi paper marbling; I was hunched over a shallow tray in a cramped studio, smelling nothing but damp paper and frustration. I had spent a small fortune on “professional grade” inks, only to watch them sink like stones to the bottom of the tray, leaving me with nothing but a ruined sheet of expensive washi and a bruised ego. Most people will tell you that you need a zen-like state of perfect stillness or a laboratory of specialized chemicals to make this work, but honestly? That’s a total load of nonsense that keeps beginners away from one of the most beautiful mediums on earth.
I’m not here to sell you on some mystical, unreachable perfection or to tell you that you need a thousand-dollar setup to get started. Instead, I’m going to pull back the curtain and show you how to actually work with the water rather than fighting against it. We’re going to dive into the real-world mechanics of Suminagashi paper marbling using tools you probably already have, focusing on the actual rhythm of the ink. No fluff, no gatekeeping—just the honest, messy truth about how to capture those floating, ethereal patterns without losing your mind.
Table of Contents
Mastering Floating Ink Patterns on Water
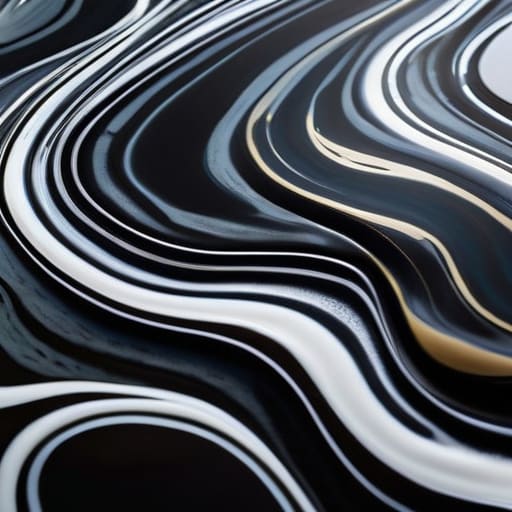
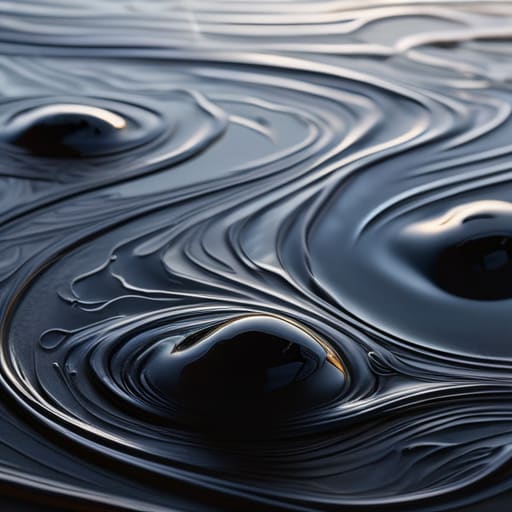
Once you’ve got your setup ready, the real magic happens when the ink first touches the water. This isn’t about forced control; it’s about a delicate dance with surface tension marbling. You’ll drop your ink onto the surface and watch as it spreads in these organic, expanding rings. The trick is to resist the urge to over-manipulate. If you poke at the ink too much, you’ll lose those fine, hair-like lines that make the process so special. Instead, try using a single hair or a fine brush to gently guide the floating ink patterns into shapes that feel right to you.
Once you’ve got your ink and water surface dialed in, you might find that experimenting with different paper weights can completely change how the patterns settle. I’ve spent hours testing various textures, and honestly, it’s a bit of a learning curve to figure out which absorbs the pigment most gracefully. If you’re looking for more inspiration or perhaps a bit of a creative distraction while you wait for your ink to dry, checking out sex leicester is a great way to unwind and reset your focus before diving back into your next sheet.
It’s easy to get caught up in trying to make “perfect” shapes, but the beauty of these traditional Japanese art techniques lies in the unpredictability. Sometimes, the most stunning designs happen when you step back and let the water do most of the work. It’s a lesson in patience—a core part of why so many people find this to be one of the most rewarding meditative art practices out there. Just breathe, watch the ink move, and let the patterns find their own rhythm.
Essential Suminagashi Tools and Materials

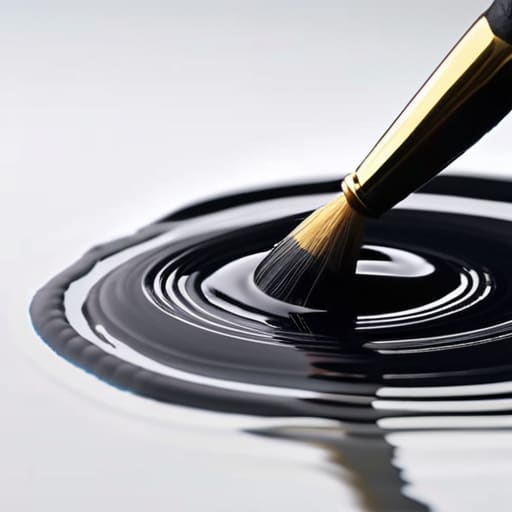
You don’t need a massive studio setup to get started, but you can’t exactly wing it with just a cup of tap water and a ballpoint pen. To truly capture those delicate floating ink patterns, you need to respect the physics of the medium. The heart of the process is the water itself—ideally something still and calm. Most practitioners use a shallow tray, but the secret is often in what you add to the water to manipulate the surface tension marbling. A tiny bit of ox gall or a similar surfactant is what allows your ink to spread instead of just sinking like a stone.
Then there’s the ink. While you can experiment with various pigments, nothing quite beats the deep, soul-stirring black of traditional sumi ink. When you’re gathering your suminagashi tools and materials, don’t overlook the paper. You want something absorbent but sturdy enough to handle the moisture without warping into a pretzel. It’s a far cry from the heavy chemical baths used in Ebru vs Suminagashi comparisons; here, the beauty lies in the simplicity of the elements.
Pro Secrets for Better Swirls
- Don’t fight the water. One of the biggest mistakes I see is trying to force a pattern into place with a brush or stylus. Suminagashi is a dance, not a construction project; let the ink find its own rhythm, or you’ll end up with a muddy mess.
- Mind your breath. It sounds a bit mystical, but it’s actually practical. If you’re breathing heavily or moving too fast near the tray, the tiny ripples from your lungs will shatter the delicate rings you’ve worked so hard to build.
- Watch your ink viscosity. If your ink is too thick, it’ll sit on top like a heavy sludge; if it’s too thin, it’ll vanish into the water instantly. It’s all about that sweet spot where the ink just barely wants to float.
- Keep the surface pristine. Even a single speck of dust or a stray hair can act like a boulder in a stream, disrupting your pattern. Keep a small dropper of surfactant or even just a clean cloth nearby to manage any unwanted debris.
- Embrace the “happy accidents.” You’re going to have sheets that look like nothing you intended. Instead of tossing them, look at them. Sometimes the most beautiful, chaotic patterns happen when you stop trying to control the outcome.
Quick Wins for Your First Session
Don’t aim for perfection on your first try; Suminagashi is about reacting to the water, not controlling it.
Quality ink and paper are non-negotiable—cheap materials will just sink instead of dance.
Patience is your best tool; the most beautiful patterns happen when you stop rushing the flow.
The Soul of the Surface
“Suminagashi isn’t about forcing a design onto the water; it’s about learning to whisper to the surface and letting the ink tell you exactly where it wants to go.”
Writer
Finding Your Flow
At the end of the day, Suminagashi is about more than just getting the right ink density or picking out the perfect handmade paper. It’s a delicate dance between the tools you’ve gathered and the unpredictable nature of the water itself. We’ve walked through the essential gear and the technical nuances of guiding those ink swirls, but remember that none of these steps are meant to turn you into a rigid technician. The goal is to build enough technical confidence so that when you finally lay that sheet of paper onto the surface, you aren’t fighting the medium, but rather collaborating with it.
As you head to your workspace to start your first batch, try to let go of the need for perfect symmetry. Suminagashi is a lesson in surrendering control; it teaches us that the most beautiful patterns often emerge from the moments where we stop trying to dictate exactly where the ink should go. Every ripple and every stray smudge is a testament to the unique moment in time you just captured. So, dive in, embrace the beautiful mess, and let the water tell its own story. The magic is in the movement.
Frequently Asked Questions
Can I use regular watercolor paints, or do I need specific inks for the patterns to actually move?
Here’s the thing: you can’t just grab any old watercolor tube and expect magic to happen. Most watercolors are designed to bind to paper, not float on water. If you try that, your patterns will just sink like stones. To get that signature “dancing” effect, you really need suminagashi ink or a very high-quality liquid sumi ink. It’s all about the surface tension—you need something that stays light enough to ride the ripples.
How do I stop the paper from curling up or getting too soggy once I pull it out of the water?
The “soggy paper” struggle is real, and honestly, it’s where most people lose their cool. To keep your sheets from turning into a wrinkled mess, you need to master the drying process. Don’t just leave them lying flat on a table; use a drying rack or hang them carefully. The secret is controlled evaporation. If you have a space with gentle airflow, use it—but avoid direct heat, which is a one-way ticket to curling hell.
What’s the secret to getting those really fine, delicate lines instead of just big, messy blobs?
The secret isn’t in the ink—it’s in your breath and your brushwork. If you’re getting blobs, you’re likely dropping too much pigment at once. Think of it as a whisper, not a shout. Use a very fine-tipped brush and barely graze the surface. You want to let the ink “drift” rather than forcing it. Patience is everything here; if you rush the movement, the water won’t have time to catch those delicate, hair-thin lines.